4. Advanced Topics
With all the things we learned in the previous chapters, you are already well equipped to start using Starling in real projects. However, while doing so, you might run into a few things that might be puzzling. For example,
-
your textures are quickly consuming all available memory.
-
you are encountering a context loss from time to time. WTF!?[1]
-
you are actually a little disappointed by the performance of your application. You want more speed!
-
or you might be one of those masochists who likes to write their own vertex and fragment shaders, but didn’t know where to start.
Oddly enough, that perfectly summarizes what this chapter is about. Buckle up Dorothy, we are now jumping into some advanced topics!
4.1. ATF Textures
In conventional Flash, most developers use the PNG format for their images, or JPG if they don’t need transparency. Those are very popular in Starling, too. However, Stage3D offers an alternative that has several unique advantages: the Adobe Texture Format, which can store compressed textures.
-
Compressed textures require just a fraction of their conventional counterparts.
-
Decompression is done directly on the GPU.
-
Uploading to graphics memory is faster.
-
Uploading can be done asynchronously: you can load new textures without interrupting gameplay. (Beginning with AIR 24, this is possible with conventional textures, as well.)
4.1.1. Graphics Memory
Before we go on, it might be interesting to know how much memory is required by a texture, anyway.
A PNG image stores 4 channels for every pixel: red, green, blue, and alpha, each with 8 bit (that makes 256 values per channel). It’s easy to calculate how much space a 512 × 512 pixel texture takes up:
Memory footprint of a 512 × 512 RGBA texture:
512 × 512 pixels × 4 bytes = 1,048,576 bytes ≈ 1 MB
When you’ve got a JPG image, it’s similar; you just spare the alpha channel.
Memory footprint of a 512 × 512 RGB texture:
512 × 512 pixels × 3 bytes = 786,432 bytes ≈ 768 kB
Quite a lot for such a small texture, right? Beware that the built-in file compression of PNG and JPG does not help: the image has to be decompressed before Stage3D can handle it. In other words: the file size does not matter; the memory consumption is always calculated with the above formula.
Nevertheless: if your textures easily fit into graphics memory that way — go ahead and use them! Those formats are very easy to work with and will be fine in many situations, especially if your application is targeting desktop hardware.
However, there might come a moment in the development phase where your memory consumption is higher than what is available on the device. This is the right time to look at the ATF format.
4.1.2. Compressed Textures
Above, we learned that the file size of a conventional texture has nothing to do with how much graphics memory it uses; a massively compressed JPG will take up just as much space as the same image in pure BMP format.
This is not true for compressed textures: they can be processed directly on the GPU. This means that, depending on the compression settings, you can load up to ten times as many textures. Quite impressive, right?
Unfortunately, each GPU vendor thought he could do better than the others, and so there are several different formats for compressed textures. In other words: depending on where your game is running, it will need a different kind of texture. How should you know beforehand which file to include?
This is where ATF comes to the rescue. It is a format that Adobe created especially for Stage3D; actually, it is a container file that can include up to four different versions of a texture.
-
PVRTC (PowerVR Texture Compression) is used in PowerVR GPUs. It is supported by all generations of the iPhone, iPod Touch, and iPad.
-
DXT1/5 (S3 Texture Compression) was originally developed by S3 Graphics. It is now supported by both Nvidia and AMD GPUs, and is thus available on most desktop computers, as well as some Android phones.
-
ETC1 (Ericsson Texture Compression) is used on many mobile phones, most notably on Android.
-
ETC2 provides higher quality RGB and RGBA compression. It is supported by all Android and iOS devices that also support OpenGL ES 3.
I wrote before that ATF is a container format. That means that it can include any combination of the above formats.
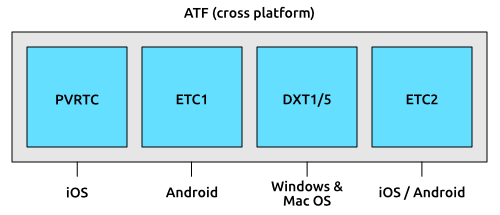
When you include all formats (which is the default), the texture can be loaded on any Stage3D-supporting device, no matter if your application is running on iOS, Android, or on the Desktop. You don’t have to care about the internals!
However, if you know that your game will only be deployed to, say, iOS devices, you can omit all formats except PVRTC. Or if you’re only targeting high end mobile devices (with at least OpenGL ES 3), include only ETC2; that works on both Android and iOS. That way, you can optimize the download size of your game.
|
The difference between DXT1 and DXT5 is just that the latter supports an alpha channel. Don’t worry about this, though: the ATF tools will choose the right format automatically. ETC1 actually does not support an alpha channel, but Stage3D works around this by using two textures internally. Again, this happens completely behind the scenes. |
4.1.3. Creating an ATF texture
Adobe provides a set of command line tools to convert to and from ATF and to preview the generated files.
They are part of the AIR SDK (look for the atftools folder).
Probably the most important tool is png2atf.
Here is a basic usage example; it will compress the texture with the standard settings in all available formats.
png2atf -c -i texture.png -o texture.atf
If you tried that out right away, you probably received the following error message, though:
Dimensions not a power of 2!
That’s a limitation I have not mentioned yet: ATF textures are required to always have side-lengths that are powers of two. While this is a little annoying, it’s actually rarely a problem, since you will almost always use them for atlas textures.
| Most atlas generators can be configured so that they create power-of-two textures. |
When the call succeeds, you can review the output in the ATFViewer.
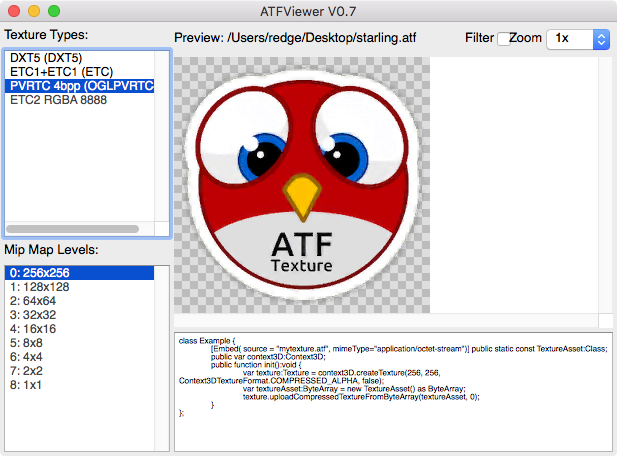
In the list on the left, you can choose which internal format you want to view. Furthermore, you see that, per default, all mipmap variants have been created.
| We will discuss mipmaps in the Memory Management chapter. |
You will probably also notice that the image quality has suffered a bit from the compression. This is because all those compression formats are lossy: the smaller memory footprint comes at the prize of a reduced quality. How much the quality suffers is depending on the type of image: while organic, photo-like textures work well, comic-like images with hard edges can suffer quite heavily.
The tool provides a lot of different options, of course. E.g. you can let it package only the PVRTC format, perfect for iOS:
png2atf -c p -i texture.png -o texture.atf
Or you can tell it to omit mipmaps in order to save memory:
png2atf -c -n 0,0 -i texture.png -o texture.atf
Another useful utility is called atfinfo.
It displays details about the data that’s stored in a specific ATF file, like the included texture formats, the number of mipmaps, etc.
> atfinfo -i texture.atf

File Name          : texture.atf
ATF Version        : 2
ATF File Type      : RAW Compressed With Alpha (DXT5+ETC1/ETC1+PVRTV4bpp)
Size               : 256x256
Cube Map           : no
Empty Mipmaps      : no
Actual Mipmaps     : 1
Embedded Levels    : X........ (256x256)
AS3 Texture Class  : Texture (flash.display3D.Texture)
AS3 Texture Format : Context3DTextureFormat.COMPRESSED_ALPHA
4.1.4. Using ATF Textures
Using a compressed texture in Starling is just as simple as any other texture.
Pass the byte array with the file contents to the factory method Texture.fromAtfData().
var atfData:ByteArray = getATFBytes(); (1)
var texture:Texture = Texture.fromATFData(atfData); (2)
var image:Image = new Image(texture); (3)| 1 | Get the raw data e.g. from a file. |
| 2 | Create the ATF texture. |
| 3 | Use it like any other texture. |
That’s it! This texture can be used like any other texture in Starling. It’s also a perfectly suitable candidate for your atlas texture.
However, the code above will upload the texture synchronously, i.e. AS3 execution will pause until that’s done. To load the texture asynchronously instead, pass a callback to the method:
Texture.fromATFData(atfData, 1, true,
    function(texture:Texture):void
    {
        var image:Image = new Image(texture);
    });
Parameters two and three control the scale factor and if mipmaps should be used, respectively. The fourth one, if passed a callback, will trigger asynchronous loading: Starling will be able to continue rendering undisturbed while that happens. As soon as the callback has been executed (but not any sooner!), the texture will be usable.
Of course, you can also embed the ATF file directly in the AS3 source.
[Embed(source="texture.atf", mimeType="application/octet-stream")]
public static const CompressedData:Class;

var texture:Texture = Texture.fromEmbeddedAsset(CompressedData);
Note, however, that asynchronous upload is not available in this case.
4.2. Context Loss
All Stage3D rendering happens through a so called "render context" (an instance of the Context3D class). It stores all current settings of the GPU, like the list of active textures, pointers to the vertex data, etc. The render context is your connection to the GPU — without it, you can’t do any Stage3D rendering.
And here comes the problem: that context can sometimes get lost. This means that you lose references to all data that was stored in graphics memory; most notably: textures.
Such a context loss doesn’t happen equally frequently on all systems; it’s rare on iOS and macOS, happens from time to time on Windows and very often on Android (rotating the screen? Bam!). So there’s no way around it: we need to expect the worst and prepare for a context loss.
|
How to trigger a context loss
There is an easy way to check if your application can handle a context loss: simply dispose the current context via |
4.2.1. Default Behavior
When Starling recognizes that the current render context has been lost, it initiates the following procedures:
-
Starling will automatically create a new context and initialize it with the same settings as before.
-
All vertex- and index buffers will be restored.
-
All vertex- and fragment programs (shaders) will be recompiled.
-
Textures will be restored by whatever means possible (from memory/disk/etc.)
Restoring buffers and programs is not problematic; Starling has all data that’s required and it doesn’t take much time. Textures, however, are a headache. To illustrate that, let’s look at the worst case example: a texture created from an embedded bitmap.
[Embed(source="hero.png")]
public static const Hero:Class;

var bitmap:Bitmap = new Hero();
var texture:Texture = Texture.fromBitmap(bitmap);
The moment you call Texture.fromBitmap, the bitmap is uploaded to GPU memory, which means it’s now part of the context.
If we could rely on the context staying alive forever, we’d be done now.
However, we cannot rely on that: the texture data could be lost anytime. That’s why Starling will keep a copy of the original bitmap. When the worst happens, it will use it to recreate the texture. All of that happens behind the scenes.
Lo and behold! That means that the texture is in memory three times.
-
The "Hero" class (conventional memory)
-
The backup bitmap (conventional memory)
-
The texture (graphics memory)
Given the tight memory constraints we’re facing on mobile, this is a catastrophe. You don’t want this to happen!
It becomes a little better if you change your code slightly:
// use the 'fromEmbeddedAsset' method instead
var texture:Texture = Texture.fromEmbeddedAsset(Hero);
That way, Starling can recreate the texture directly from the embedded class (calling new Hero()), which means that the texture is in memory only two times.
For embedded assets, that’s your best bet.
Ideally, though, we want to have the texture in memory only once. For this to happen, you must not embed the asset; instead, you need to load it from an URL that points to a local or remote file. That way, only the URL needs to be stored; the actual data can then be reloaded from the original location.
There are two ways to make this happen:
-
Use the AssetManager to load your textures.
-
Restore the texture manually.
My recommendation is to use the AssetManager whenever possible. It will handle a context loss without wasting any memory; you don’t have to add any special restoration logic whatsoever.
Nevertheless, it’s good to know what’s happening behind the scenes. Who knows — you might run into a situation where a manual restoration is your only choice.
4.2.2. Manual Restoration
You might wonder how Texture.fromEmbeddedAsset() works internally.
Let’s look at a possible implementation of that method:
public static function fromEmbeddedAsset(assetClass:Class):Texture
{
    var texture:Texture = Texture.fromBitmap(new assetClass());
    texture.root.onRestore = function():void
    {
        texture.root.uploadFromBitmap(new assetClass());
    };
    return texture;
}
You can see that the magic is happening in the root.onRestore callback.
Wait a minute: what’s root?
You might not know it, but when you’ve got a Texture instance, that’s actually often not a concrete texture at all.
In reality, it might be just a pointer to a part of another texture (a SubTexture).
Even the fromBitmap call could return such a texture!
(Explaining the reasoning behind that would be beyond the scope of this chapter, though.)
In any case, texture.root will always return the ConcreteTexture object, and that’s where the onRestore callback is found.
This callback will be executed directly after a context loss, and it gives you the chance of recreating your texture.
In our case, that callback simply instantiates the bitmap once again and uploads it to the root texture. Voilà, the texture is restored!
The devil lies in the details, though.
You have to construct your onRestore-callback very carefully to be sure not to store another bitmap copy without knowing it.
Here’s one innocent looking example that’s actually totally useless:
public static function fromEmbeddedAsset(assetClass:Class):Texture
{
    // DO NOT use this code! BAD example.

    var bitmap:Bitmap = new assetClass();
    var texture:Texture = Texture.fromBitmap(bitmap);
    texture.root.onRestore = function():void
    {
        texture.root.uploadFromBitmap(bitmap);
    };
    return texture;
}
Can you spot the error?
The problem is that the method creates a Bitmap object and uses it in the callback.
That callback is actually a so-called closure; that’s an inline function that will be stored together with some of the variables that accompany it.
In other words, you’ve got a function object that stays in memory, ready to be called when the context is lost.
And the bitmap instance is stored inside it, even though you never explicitly said so.
(Well, in fact you did, by using bitmap inside the callback.)
In the original code, the bitmap is not referenced, but created inside the callback.
Thus, there is no bitmap instance to be stored with the closure.
Only the assetClass object is referenced in the callback — and that is in memory, anyway.
That technique works in all kinds of scenarios:
-
If your texture originates from an URL, you pass only that URL to the callback and reload it from there.
-
For ATF textures, the process is just the same, except that you need to upload the data with
root.uploadATFDatainstead. -
For a bitmap containing a rendering of a conventional display object, just reference that display object and draw it into a new bitmap in the callback. (That’s just what Starling’s TextField class does.)
| Let me emphasize: the AssetManager does all this for you, so that’s the way to go. I just wanted to show you how that is achieved. |
4.2.3. Render Textures
Another area where a context loss is especially nasty: render textures. Just like other textures, they will lose all their contents — but there’s no easy way to restore them. After all, their content is the result of any number of dynamic draw operations.
If the RenderTexture is just used for eye candy (say, footprints in the snow), you might be able to just live with it getting cleared. If its content is crucial, on the other hand, you need a solution for this problem.
There’s no way around it: you will need to manually redraw the texture’s complete contents.
Again, the onRestore callback could come to the rescue:
renderTexture.root.onRestore = function():void
{
    var contents:Sprite = getContents();
    renderTexture.clear(); // required on texture restoration
    renderTexture.draw(contents);
});
I hear you: it’s probably more than just one object, but a bunch of draw calls executed over a longer period. For example, a drawing app with a RenderTexture-canvas, containing dozens of brush strokes.
In such a case, you need to store sufficient information about all draw commands to be able to reproduce them.
If we stick with the drawing app scenario, you might want to add support for an undo/redo system, anyway. Such a system is typically implemented by storing a list of objects that encapsulate individual commands. You can re-use that system in case of a context loss to restore all draw operations.
Now, before you start implementing this system, there is one more gotcha you need to be aware of.
When the root.onRestore callback is executed, it’s very likely that not all of your textures are already available.
After all, they need to be restored, too, and that might take a while!
If you loaded your textures with the AssetManager, however, it has got you covered.
In that case, you can listen to its TEXTURES_RESTORED event instead.
Also, make sure to use drawBundled for optimal performance.
assetManager.addEventListener(Event.TEXTURES_RESTORED, function():void
{
    renderTexture.drawBundled(function():void
    {
        for each (var command:DrawCommand in listOfCommands)
            command.redraw(); // executes `renderTexture.draw()`
    });
});
This time, there is no need to call clear, because that’s the default behavior of onRestore, anyway — and we did not modify that.
Remember, we are in a different callback here (Event.TEXTURES_RESTORED), and onRestore has not been modified from its default implementation.
|
4.3. Memory Management
Many Starling developers use the framework to create apps and games for mobile devices. And almost all of those developers will sooner or later find out (the hard way) that mobile devices are notoriously low on memory. Why is that?
-
Most mobile devices have screens with extremely high resolutions.
-
2D games for such devices require equally high resolution textures.
-
The available RAM is too small to hold all that texture data.
In other words, a really vicious combination.
What happens if you do run out of memory? Most of the time, you will get the famous error 3691 ("Resource limit for this resource type exceeded") and your app will crash. The following hints will show you ways to avoid this nasty error!
4.3.1. Dispose your Waste
When you don’t need an object any longer, don’t forget to call dispose on it.
Different to conventional Flash objects, the garbage collector will not clean up any Stage3D resources!
You are responsible for that memory yourself.
Textures
Those are the most important objects you need to take care of. Textures will always take up the biggest share of your memory.
Starling tries to help you with this, of course. For example, when you load your textures from an atlas, you only need to dispose the atlas, not the actual SubTextures. Only the atlas requires GPU memory, the "offspring" textures will just reference the atlas texture.
var atlas:TextureAtlas = ...;
var hero:Texture = atlas.getTexture("hero");

atlas.dispose(); // will invalidate "hero" as well.
Display Objects
While display objects themselves do not require a lot of graphics memory (some do not require any at all), it’s a good practice to dispose them, too. Be especially careful with "heavy" objects like TextFields.
Display object containers will take care of all their children, as is to be expected. When you dispose a container, all children will be disposed automatically.
var parent:Sprite = new Sprite();
var child1:Quad = new Quad(100, 100, Color.RED);
var child2:Quad = new Quad(100, 100, Color.GREEN);

parent.addChild(child1);
parent.addChild(child2);

parent.dispose(); // will dispose the children, too
All in all, though, recent Starling versions have become more forgiving when it comes to disposing display objects. Most display objects do not store Stage3D resources any longer, so it’s not a catastrophe if you forget to dispose one.
Images
Here’s the first pitfall: disposing an image will not dispose its texture.
var texture:Texture = Texture.fromBitmap(/* ... */);
var image:Image = new Image(texture);

image.dispose(); // will NOT dispose texture!
That’s because Starling can’t know if you’re using this texture anywhere else! After all, you could have other images that use the same texture.
On the other hand, if you know that the texture is not used anywhere else, get rid of it.
image.texture.dispose();
image.dispose();
Filters
Fragment filters are a little delicate, too. When you dispose an object, the filter will be disposed, as well:
var object:Sprite = createCoolSprite();
object.filter = new BlurFilter();
object.dispose(); // will dispose filter
But watch out: the following similar code will not dispose the filter:
var object:Sprite = createCoolSprite();
object.filter = new BlurFilter();
object.filter = null; // filter will *not* be disposed
Again, the reason is that Starling can’t know if you want to use the filter elsewhere.
However, in practice, this is not a problem. The filter is not disposed, but Starling will still clean up all its resources. So you won’t create a memory leak.
| In previous Starling versions (< 2.0), this did create a memory leak. |
4.3.2. Do not Embed Textures
ActionScript developers have always been used to embedding their bitmaps directly into the SWF file, using Embed metadata.
This is great for the web, because it allows you to combine all your game’s data into one file.
We already saw in the Context Loss section that this approach has some serious downsides in Starling (or Stage3D in general). It comes down to this: the texture will be in memory at least two times: once in conventional memory, once in graphics memory.
[Embed(source="assets/textures/hero.png")]
private static var Hero:Class; (1)

var texture:Texture = Texture.fromEmbeddedAsset(Hero); (2)| 1 | The class is stored in conventional memory. |
| 2 | The texture is stored in graphics memory. |
Note that this sample uses Texture.fromEmbeddedAsset to load the texture.
For reasons discussed in Context Loss, the alternative (Texture.fromBitmap) uses even more memory.
The only way to guarantee that the texture is really only stored in graphics memory is by loading it from an URL. If you use the AssetManager for this task, that’s not even a lot of work.
var appDir:File = File.applicationDirectory;
var assets:AssetManager = new AssetManager();

assets.enqueue(appDir.resolvePath("assets/textures"));
assets.loadQueue(...);

var texture:Texture = assets.getTexture("hero");
4.3.3. Use RectangleTextures
Starling’s Texture class is actually just a wrapper for two Stage3D classes:
flash.display3D.textures.Texture-
Available in all profiles. Supports mipmaps and wrapping, but requires side-lengths that are powers of two.
flash.display3D.textures.RectangleTexture-
Available beginning with
BASELINEprofile. No mipmaps, no wrapping, but supports arbitrary side-lengths.
The former (Texture) has a strange and little-known side effect: it will always allocate memory for mipmaps, whether you need them or not.
That means that you will waste about one third of texture memory!
Thus, it’s preferred to use the alternative (RectangleTexture).
Starling will use this texture type whenever possible.
However, it can only do that if you run at least in BASELINE profile, and if you disable mipmaps.
The first requirement can be fulfilled by picking the best available Context3D profile.
That happens automatically if you use Starling’s default constructor.
// init Starling like this:
... = new Starling(Game, stage);

// that's equivalent to this:
... = new Starling(Game, stage, null, null, "auto", "auto");
The last parameter (auto) will tell Starling to use the best available profile.
This means that if the device supports RectangleTextures, Starling will use them.
As for mipmaps: they will only be created if you explicitly ask for them.
Some of the Texture.from… factory methods contain such a parameter, and the AssetManager features a useMipMaps property.
Per default, they are always disabled.
4.3.4. Use ATF Textures
We already talked about ATF Textures previously, but it makes sense to mention them again in this section. Remember, the GPU cannot make use of JPG or PNG compression; those files will always be decompressed and uploaded to graphics memory in their uncompressed form.
Not so with ATF textures: they can be rendered directly from their compressed form, which saves a lot of memory. So if you skipped the ATF section, I recommend you take another look!
The downside of ATF textures is the reduced image quality, of course. But while it’s not feasible for all types of games, you can try out the following trick:
-
Create your textures a little bigger than what’s actually needed.
-
Now compress them with the ATF tools.
-
At runtime, scale them down to their original size.
You’ll still save a quite a bit of memory, and the compression artifacts will become less apparent.
4.3.5. Use 16 bit Textures
If ATF textures don’t work for you, chances are that your application uses a comic-style with a limited color palette. I’ve got good news for you: for these kinds of textures, there’s a different solution!
-
The default texture format (
Context3DTextureFormat.BGRA) uses 32 bits per pixel (8 bits for each channel). -
There is an alternative format (
Context3DTextureFormat.BGRA_PACKED) that uses only half of that: 16 bits per pixel (4 bits for each channel).
You can use this format in Starling via the format argument of the Texture.from… methods, or via the AssetManager’s textureFormat property.
This will save you 50% of memory!
Naturally, this comes at the price of a reduced image quality. Especially if you’re making use of gradients, 16 bit textures might become rather ugly. However, there’s a solution for this: dithering!
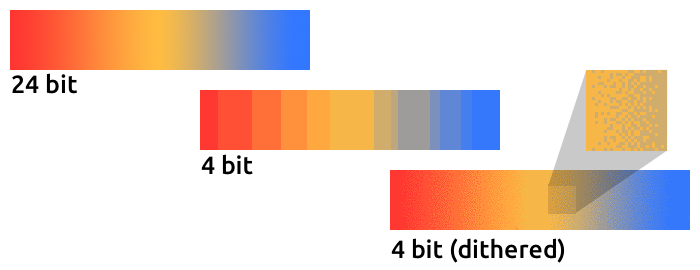
To make it more apparent, the gradient in this sample was reduced to just 16 colors (4 bits). Even with this low number of colors, dithering manages to deliver an acceptable image quality.
Most image processing programs will use dithering automatically when you reduce the color depth. TexturePacker has you covered, as well.
The AssetManager can be configured to select a suitable color depth on a per-file basis.
var assets:AssetManager = new AssetManager();

// enqueue 16 bit textures
assets.textureOptions.format = Context3DTextureFormat.BGRA_PACKED;
assets.enqueue(/* ... */);

// enqueue 32 bit textures
assets.textureOptions.format = Context3DTextureFormat.BGRA;
assets.enqueue(/* ... */);

// now start the loading process
assets.loadQueue(/* ... */);
4.3.6. Avoid Mipmaps
Mipmaps are downsampled versions of your textures, intended to increase rendering speed and reduce aliasing effects.

Since version 2.0, Starling doesn’t create any mipmaps by default. That turned out to be the preferable default, because without mipmaps:
-
Textures load faster.
-
Textures require less texture memory (just the original pixels, no mipmaps).
-
Blurry images are avoided (mipmaps sometimes become fuzzy).
On the other hand, activating them will yield a slightly faster rendering speed when the object is scaled down significantly, and you avoid aliasing effects (i.e. the effect contrary to blurring).
To enable mipmaps, use the corresponding parameter in the Texture.from… methods.
4.3.7. Use Bitmap Fonts
As already discussed, TextFields support two different kinds of fonts: TrueType fonts and Bitmap Fonts.
While TrueType fonts are very easy to use, they have a few downsides.
-
Whenever you change the text, a new texture has to be created and uploaded to graphics memory. This is slow.
-
If you’ve got many TextFields or big ones, this will require a lot of texture memory.
Bitmap Fonts, on the other hand, are
-
updated very quickly and
-
require only a constant amount of memory (just the glyph texture).
That makes them the preferred way of displaying text in Starling. My recommendation is to use them whenever possible!
| Bitmap Font textures are a great candidate for 16 bit textures, because they are often just pure white that’s tinted to the actual TextField color at runtime. |
4.3.8. Optimize your Texture Atlas
It should be your top priority to pack your texture atlases as tightly as possible. Tools like TexturePacker have several options that will help with that:
-
Trim transparent borders away.
-
Rotate textures by 90 degrees if it leads to more effective packing.
-
Reduce the color depth (see above).
-
Remove duplicate textures.
-
etc.
Make use of this! Packing more textures into one atlas not only reduces your overall memory consumption, but also the number of draw calls (more on that in the next chapter).
4.3.9. Use Adobe Scout
Adobe Scout is a lightweight but comprehensive profiling tool for ActionScript and Stage3D. Any Flash or AIR application, regardless of whether it runs on mobile devices or in browsers, can be quickly profiled with no change to the code — and Adobe Scout quickly and efficiently detects problems that could affect performance.
With Scout, you can not only find performance bottlenecks in your ActionScript code, but you’ll also find a detailed roundup of your memory consumption over time, both for conventional and graphics memory. This is priceless!
| Adobe Scout is part of the free version of Adobe’s Creative Cloud membership. You don’t have to become a paying subscriber of CC to get it. |
Here is a great tutorial from Thibault Imbert that explains in detail how to work with Adobe Scout: Getting started with Adobe Scout.

4.3.10. Keep an Eye on the Statistics Display
The statistics display (available via starling.showStats) includes information about both conventional memory and graphics memory.
It pays off to keep an eye on these values during development.
Granted, the conventional memory value is often misleading — you never know when the garbage collector will run. The graphics memory value, on the other hand, is extremely accurate. When you create a texture, the value will rise; when you dispose a texture, it will decrease — immediately.
Actually, just about five minutes after I added this feature to Starling, I had already found the first memory leak — in the demo app. I used the following approach:
-
In the main menu, I noted down the used GPU memory.
-
Then I entered the demos scenes, one after another.
-
Each time I returned to the main menu, I checked if the GPU memory had returned to the original value.
-
After returning from one of the scenes, that value was not restored, and indeed: a code review showed that I had forgotten to dispose one of the textures.

Needless to say: Scout offers far more details on memory usage. But the simple fact that the statistics display is always available makes it possible to find things that would otherwise be easily overlooked.
4.4. Performance Optimization
While Starling mimics the classic display list of Flash, what it does behind the scenes is quite different. To achieve the best possible performance, you have to understand some key concepts of its architecture. Here is a list of best practices you can follow to have your game run as fast as possible.
4.4.1. General AS3 Tips
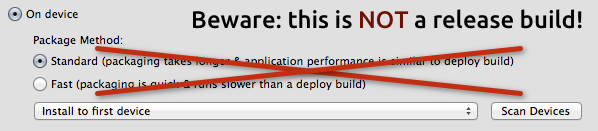
Always make a Release Build
The most important rule right at the beginning: always create a release build when you test performance. Unlike conventional Flash projects, a release build makes a huge difference when you use a Stage3D framework. The speed difference is immense; depending on the platform you’re working on, you can easily get a multiple of the framerate of a debug build.
-
In Flash Builder, release builds are created by clicking on .
-
In Flash Develop, choose the "Release" configuration and build the project; then choose "ipa-ad-hoc" or "ipa-app-store" option when you execute the "PackageApp.bat" script.
-
In IntelliJ IDEA, select ; choose "release" for Android and "ad hoc distribution" for iOS. For non-AIR projects, deselect "Generate debuggable SWF" in the module’s compiler options.
-
If you build your Starling project from command line, make sure
-optimizeis true and-debugis false.
Check your Hardware
Be sure that Starling is indeed using the GPU for rendering.
That’s easy to check: if Starling.current.context.driverInfo contains the string Software, then Stage3D is in software fallback mode, otherwise it’s using the GPU.
Furthermore, some mobile devices can be run in a Battery Saving Mode. Be sure to turn that off when making performance tests.
Set the Framerate
Your framerate is somehow stuck at 24 frames per second, no matter how much you optimize? Then you probably never set your desired framerate, and you’ll see the Flash Player’s default setting.
To change that, either use the appropriate metadata on your startup class, or manually set the framerate at the Flash stage.
[SWF(frameRate="60", backgroundColor="#000000")]
public class Startup extends Sprite
{ /* ... */ }

// or anywhere else
Starling.current.nativeStage.frameRate = 60;
Use Adobe Scout
Adobe Scout is not only useful for memory analysis; it’s just as powerful when it comes to performance profiling.
It allows you to actually see how much time is actually spent in each of your (and Starling’s) ActionScript methods. This is extremely useful, because it shows you where you can gain most from any optimizations. Without it, you might end up optimizing areas of your code that are actually not relevant to the framerate at all!
| Remember, premature optimization is the root of all evil! |
What’s nice compared to classic profilers is that it also works in release mode, with all optimizations in place. That ensures that its output is extremely accurate.
Decode Loaded Images Asynchronously
By default, if you use a Loader to load a PNG or JPEG image, the image data is not decoded right away, but when you first use it.
This happens on the main thread and can cause your application to stutter on texture creation.
To avoid that, set the image decoding policy flag to ON_LOAD.
This will cause the image to be decoded directly in the Loader’s background thread.
loaderContext.imageDecodingPolicy = ImageDecodingPolicy.ON_LOAD;
loader.load(url, loaderContext);
On the other hand, you are probably using Starling’s AssetManager to load your textures, aren’t you? In that case, don’t worry: it makes use of this practice, anyway.
Avoid "for each"
When working with loops that are repeated very often or are deeply nested, it’s better to avoid for each; the classic for i yields a better performance.
Furthermore, beware that the loop condition is executed once per loop, so it’s faster to save it into an extra variable.
// slowish:
for each (var item:Object in array) { ... }

// better:
for (var i:int=0; i<array.length; ++i) { ... }

// fastest:
var length:int = array.length;
for (var i:int=0; i<length; ++i) { ... }
Avoid Allocations
Avoid creating a lot of temporary objects. They take up memory and need to be cleaned up by the garbage collector, which might cause small hiccups when it’s running.
// bad:
for (var i:int=0; i<10; ++i)
{
    var point:Point = new Point(i, 2*i);
    doSomethingWith(point);
}

// better:
var point:Point = new Point();
for (var i:int=0; i<10; ++i)
{
    point.setTo(i, 2*i);
    doSomethingWith(point);
}
Actually, Starling contains a class that helps with that: Pool. It provides a pool of objects that are often required, like Point, Rectangle and Matrix. You can "borrow" objects from that pool and return them when you’re done.
// best:
var point:Point = Pool.getPoint();
for (var i:int=0; i<10; ++i)
{
    point.setTo(i, 2*i);
    doSomethingWith(point);
}
Pool.putPoint(point); // don't forget this!
4.4.2. Starling Specific Tips
Minimize State Changes
As you know, Starling uses Stage3D to render the display list. This means that all drawing is done by the GPU.
Now, Starling could send one quad after the other to the GPU, drawing one by one. In fact, this is how the very first Starling release worked! For optimal performance, though, GPUs prefer to get a huge pile of data and draw all of it at once.
That’s why newer Starling versions batch as many quads together as possible before sending them to the GPU. However, it can only batch quads that have similar properties. Whenever a quad with a different "state" is encountered, a "state change" occurs, and the previously batched quads are drawn.
|
I use Quad and Image synonymously in this section. Remember, Image is just a subclass of Quad that adds a few methods. Besides, Quad extends Mesh, and what you read below is true for meshes, as well. |
These are the crucial properties that make up a state:
-
The texture (different subtextures from the same atlas are fine, though)
-
The blendMode of display objects
-
The textureSmoothing value of meshes/quads/images
-
The textureRepeat mode of meshes/quads/images
If you set up your scene in a way that creates as little state changes as possible, your rendering performance will profit immensely.
Again, Starling’s statistics display provides useful data. It shows exactly how many draw calls are executed per frame. The more state changes you have, the higher this number will be.
|
The statistics display causes draw calls, as well. However, Starling explicitly decrements the draw count displayed to take that into account. |
Your target should always be to keep it as low as possible. The following tips will show you how.
The Painter’s Algorithm
To know how to minimize state changes, you need to know the order in which Starling processes your objects.
Like Flash, Starling uses the Painter’s algorithm to process the display list. This means that it draws your scene like a painter would do it: starting at the object at the bottom layer (e.g. the background image) and moving upwards, drawing new objects on top of previous ones.
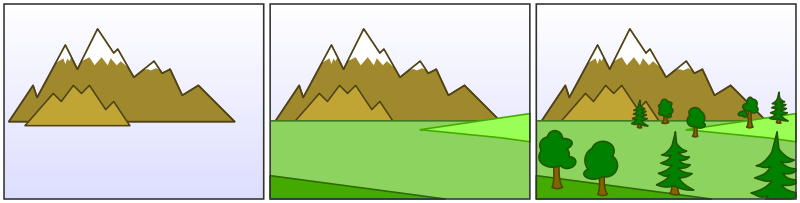
If you’d set up such a scene in Starling, you could create three sprites: one containing the mountain range in the distance, one with the ground, and one with the vegetation. The mountain range would be at the bottom (index 0), the vegetation at the top (index 2). Each sprite would contain images that contain the actual objects.
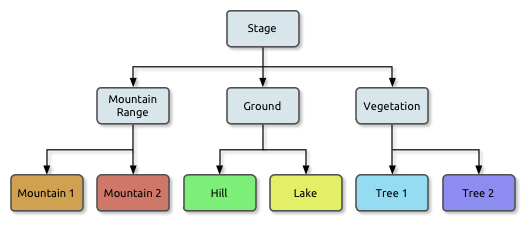
On rendering, Starling would start at the left with "Mountain 1" and continue towards the right, until it reaches "Tree 2". If all those objects have a different state, this would mean six draw calls. That’s exactly what will happen if you load each object’s texture from a separate Bitmap.
The Texture Atlas
That’s one of the reasons why texture atlases are so important. If you load all those textures from one single atlas, Starling will be able to draw all objects at once! (At least if the other properties listed above do not change.)
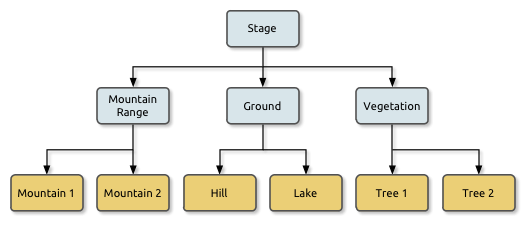
The consequence of this is that you should always use an atlas for your textures. Here, each image uses the same atlas (depicted by all nodes having the same color).
Sometimes, though, not all of your textures will fit into a single atlas. The size of textures is limited, so you’ll run out of space sooner or later. But this is no problem, as long as you arrange your textures in a smart way.
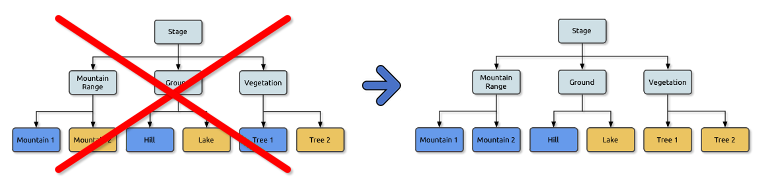
Both those examples use two atlases (again, one color per atlas). But while the display list on the left will force a state change for each object, the version on the right will be able to draw all objects in just two batches.
Use the MeshBatch class
The fastest way to draw a huge number of quads or other meshes at once is to use the MeshBatch class. That’s the same class that is used internally by Starling for all rendering, so it’s heavily optimized. It works like this:
var meshBatch:MeshBatch = new MeshBatch();
var image:Image = new Image(texture);

for (var i:int=0; i<100; ++i)
{
    meshBatch.addMesh(image);
    image.x += 10;
}

addChild(meshBatch);
Did you notice? You can add the same image as often as you want! Furthermore, adding it is a very fast operation; e.g. no event will be dispatched (which is the case when you add an object to a container).
As expected, this has some downsides, though:
-
All the objects you add must have the same state (i.e. use textures from the same atlas). The first image you add to the MeshBatch will decide on its state. You can’t change the state later, except by resetting it completely.
-
You can only add instances of the Mesh class or its subclasses (that includes Quad, Image, and even MeshBatch).
-
Object removal is quite tricky: you can only remove meshes by trimming the number of vertices and indices of the batch. However, you can overwrite meshes at a certain index.
For these reasons, it’s only suitable for very specific use-cases (the BitmapFont class, for example, uses a mesh batch internally). In those cases, it’s definitely the fastest option, though. You won’t find a more efficient way to render a huge number of objects in Starling.
| If you’re still using Starling 1.x, look for the QuadBatch class instead. |
Batch your TextFields
Per default, a TextField will require one draw call, even if your glyph texture is part of your main texture atlas. That’s because long texts require a lot of CPU time to batch; it’s faster to simply draw them right away (without copying them to a MeshBatch).
However, if your text field contains only a few letters (rule of thumb: below 16), you can enable the batchable property on the TextField.
With that enabled, your texts will be batched just like other display objects.
Use BlendMode.NONE
If you’ve got totally opaque, rectangular textures, help the GPU by disabling blending for those textures. This is especially useful for large background images.
backgroundImage.blendMode = BlendMode.NONE;Naturally, this will also mean an additional state change, so don’t overuse this technique. For small images, it’s probably not worth the effort (except if they’d cause a state change, anyway, for some other reason).
Use stage.color
Oftentimes, the actual stage color is actually never seen in your game, because there are always images or meshes on top of the stage.
In that case, always set it to clear black (0x0) or white (0xffffff).
There seems to be a fast hardware optimization path for a context.clear on some mobile hardware when it is called with either all 1’s or all 0’s.
Some developers reported a full millisecond of spared rendering time per frame, which is a very nice gain for such a simple change!
[SWF(backgroundColor="#0")]
public class Startup extends Sprite
{
    // ...
}
On the other hand, if the background of your game is a flat color, you can make use of that, too: just set the stage color to that value instead of displaying an image or a colored quad. Starling has to clear the stage once per frame, anyway — thus, if you change the stage color, that operation won’t cost anything.
[SWF(backgroundColor="#ff2255")]
public class Startup extends Sprite
{
    // ...
}
Avoid querying width and height
The width and height properties are more expensive than one would guess intuitively, especially on sprites.
A matrix has to be calculated, and each vertex of each child will be multiplied with that matrix.
For that reason, avoid accessing them repeatedly, e.g. in a loop. In some cases, it might even make sense to use a constant value instead.
// bad:
for (var i:int=0; i<numChildren; ++i)
{
    var child:DisplayObject = getChildAt(i);
    if (child.x > wall.width)
        child.removeFromParent();
}

// better:
var wallWidth:Number = wall.width;
for (var i:int=0; i<numChildren; ++i)
{
    var child:DisplayObject = getChildAt(i);
    if (child.x > wallWidth)
        child.removeFromParent();
}
Make containers non-touchable
When you move the mouse/finger over the screen, Starling has to find out which object is hit. This can be an expensive operation, because it requires a hit-test on each and every display object (in the worst case).
Thus, it helps to make objects untouchable if you don’t care about them being touched, anyway. It’s best to disable touches on complete containers: that way, Starling won’t even have to iterate over their children.
// good:
for (var i:int=0; i<container.numChildren; ++i)
    container.getChildAt(i).touchable = false;

// even better:
container.touchable = false;
Hide objects that are outside the Stage bounds
Starling will send any object that is part of the display list to the GPU. This is true even for objects that are outside the stage bounds!
You might wonder: why doesn’t Starling simply ignore those invisible objects? The reason is that checking the visibility in a universal way is quite expensive. So expensive, in fact, that it’s faster to send objects up to the GPU and let it do to the clipping. The GPU is actually very efficient with that and will abort the whole rendering pipeline very early if the object is outside the screen bounds.
However, it still takes time to upload that data, and you can avoid that.
Within the high level game logic, it’s often easier to make visibility checks (you can e.g. just check the x/y coordinates against a constant).
If you’ve got lots of objects that are outside those bounds, it’s worth the effort.
Remove those elements from the stage or set their visible property to false.
Make use of Event Pooling
Compared to classic Flash, Starling adds an additional method for event dispatching:
// classic way:
object.dispatchEvent(new Event("type", bubbles));

// new way:
object.dispatchEventWith("type", bubbles);
The new approach will dispatch an event object just like the first one, but behind the scenes, it will pool event objects for you. That means that you will save the garbage collector some work.
In other words, it’s less code to write and is faster — thus, it’s the preferred way to dispatch events.
(Except if you need to dispatch a custom subclass of Event; they cannot be dispatched with that method.)
4.5. Custom Filters
Are you ready to get your hands dirty? We are now entering the realm of custom rendering code, starting with a simple fragment filter.
Yes, this will involve some low level code; heck, you’ll even write a few lines of assembler! But fear not, it’s not rocket science. As my old math teacher used to say: a drilled monkey could do that!
| Remember: filters work on the pixel level of display objects. The filtered object is rendered into a texture, which is then processed by a custom fragment shader (hence the name fragment filter). |
4.5.1. The Goal
Even though we’re picking a simple goal, it should be a useful one, right? So let’s create a ColorOffsetFilter.
You probably know that you can tint any vertex of a mesh by assigning it a color. On rendering, the color will be multiplied with the texture color, which provides a very simple (and fast) way to modify the color of a texture.
var image:Image = new Image(texture);
image.color = 0x808080; // R = G = B = 0.5
The math behind that is extremely simple: on the GPU, each color channel (red, green, blue) is represented by a value between zero and one. Pure red, for example, would be:
R = 1, G = 0, B = 0
On rendering, this color is then multiplied with the color of each pixel of the texture (also called "texel").
The default value for an image color is pure white, which is a 1 on all channels.
Thus, the texel color appears unchanged (a multiplication with 1 is a no-op).
When you assign a different color instead, the multiplication will yield a new color, e.g.
R = 1,   G = 0.8, B = 0.6  ×
R = 0.5, G = 0.5, B = 0.5
-------------------------
R = 0.5, G = 0.4, B = 0.3
And here’s the problem: this will only ever make an object darker, never brighter. That’s because we can only multiply with values between 0 and 1; zero meaning the result will be black, and one meaning it remains unchanged.

That’s what we want to fix with this filter! We’re going to include an offset to the formula. (In classic Flash, you would do that with a ColorTransform.)
-
New red value = (old red value × redMultiplier) + redOffset
-
New green value = (old green value × greenMultiplier) + greenOffset
-
New blue value = (old blue value × blueMultiplier) + blueOffset
-
New alpha value = (old alpha value × alphaMultiplier) + alphaOffset
We already have the multiplier, since that’s handled in the base Mesh class; our filter just needs to add the offset.
So let’s finally start, shall we?!
4.5.2. Extending FragmentFilter
All filters extend the class starling.filters.FragmentFilter, and this one is no exception.
Now hold tight: I’m going to give you the complete ColorOffsetFilter class now; this is not a stub, but the final code.
We won’t modify it any more.
public class ColorOffsetFilter extends FragmentFilter
{
    public function ColorOffsetFilter(
        redOffset:Number=0, greenOffset:Number=0,
        blueOffset:Number=0, alphaOffset:Number=0):void
    {
        colorOffsetEffect.redOffset = redOffset;
        colorOffsetEffect.greenOffset = greenOffset;
        colorOffsetEffect.blueOffset = blueOffset;
        colorOffsetEffect.alphaOffset = alphaOffset;
    }

    override protected function createEffect():FilterEffect
    {
        return new ColorOffsetEffect();
    }

    private function get colorOffsetEffect():ColorOffsetEffect
    {
        return effect as ColorOffsetEffect;
    }

    public function get redOffset():Number
    {
        return colorOffsetEffect.redOffset;
    }

    public function set redOffset(value:Number):void
    {
        colorOffsetEffect.redOffset = value;
        setRequiresRedraw();
    }

    // the other offset properties need to be implemented accordingly.

    public function get/set greenOffset():Number;
    public function get/set blueOffset():Number;
    public function get/set alphaOffset():Number;
}
That’s surprisingly compact, right? Well, I have to admit it: this is just half of the story, because we’re going to have to write another class, too, which does the actual color processing. Still, it’s worthwhile to analyze what we see above.
The class extends FragmentFilter, of course, and it overrides one method: createEffect.
You probably haven’t run into the starling.rendering.Effect class before, because it’s really only needed for low-level rendering.
From the API documentation:
An effect encapsulates all steps of a Stage3D draw operation. It configures the render context and sets up shader programs as well as index- and vertex-buffers, thus providing the basic mechanisms of all low-level rendering.
The FragmentFilter class makes use of this class, or actually its subclass called FilterEffect.
For this simple filter, we just have to provide a custom effect, which we’re doing by overriding createEffect().
The properties do nothing else than configuring our effect.
On rendering, the base class will automatically use the effect to render the filter.
That’s it!
If you’re wondering what the colorOffsetEffect property does: that’s just a shortcut to be able to access the effect without constantly casting it to ColorOffsetEffect.
The base class provides an effect property, too, but that will return an object of type FilterEffect — and we need the full type, ColorOffsetEffect, to access our offset properties.
|
More complicated filters might need to override the process method as well; that’s e.g. necessary to create multi-pass filters.
For our sample filter, though, that’s not necessary.
Finally, note the calls to setRequiresRedraw: they make sure the effect is re-rendered whenever the settings change.
Otherwise, Starling wouldn’t know that it has to redraw the object.
4.5.3. Extending FilterEffect
Time to do some actual work, right? Well, our FilterEffect subclass is the actual workhorse of this filter. Which doesn’t mean that it’s very complicated, so just bear with me.
Let’s start with a stub:
public class ColorOffsetEffect extends FilterEffect
{
    private var _offsets:Vector.<Number>;

    public function ColorOffsetEffect()
    {
        _offsets = new Vector.<Number>(4, true);
    }

    override protected function createProgram():Program
    {
        // TODO
    }

    override protected function beforeDraw(context:Context3D):void
    {
        // TODO
    }

    public function get redOffset():Number { return _offsets[0]; }
    public function set redOffset(value:Number):void { _offsets[0] = value; }

    public function get greenOffset():Number { return _offsets[1]; }
    public function set greenOffset(value:Number):void { _offsets[1] = value; }

    public function get blueOffset():Number { return _offsets[2]; }
    public function set blueOffset(value:Number):void { _offsets[2] = value; }

    public function get alphaOffset():Number { return _offsets[3]; }
    public function set alphaOffset(value:Number):void { _offsets[3] = value; }
}
Note that we’re storing the offsets in a Vector, because that will make it easy to upload them to the GPU.
The offset properties read from and write to that vector.
Simple enough.
It gets more interesting when we look at the two overridden methods.
createProgram
This method is supposed to create the actual Stage3D shader code.
|
I’ll show you the basics, but explaining Stage3D thoroughly is beyond the scope of this manual. To get deeper into the topic, you can always have a look at one of the following tutorials: |
All Stage3D rendering is done through vertex- and fragment-shaders. Those are little programs that are executed directly by the GPU, and they come in two flavors:
-
Vertex Shaders are executed once for each vertex. Their input is made up from the vertex attributes we typically set up via the
VertexDataclass; their output is the position of the vertex in screen coordinates. -
Fragment Shaders are executed once for each pixel (fragment). Their input is made up of the interpolated attributes of the three vertices of their triangle; the output is simply the color of the pixel.
-
Together, a fragment and a vertex shader make up a Program.
The language filters are written in is called AGAL, an assembly language. (Yes, you read right! This is as low-level as it gets.) Thankfully, however, typical AGAL programs are very short, so it’s not as bad as it sounds.
|
A quick tip: be sure to always enable Just be sure to disable the property again for release builds, as it has a negative impact on performance. |
Good news: we only need to write a fragment shader. The vertex shader is the same for most fragment filters, so Starling provides a standard implementation for that. Let’s look at the code:
override protected function createProgram():Program
{
    var vertexShader:String = STD_VERTEX_SHADER;
    var fragmentShader:String =
        "tex ft0, v0, fs0 <2d, linear> \n" +
        "add oc, ft0, fc0";

    return Program.fromSource(vertexShader, fragmentShader);
}
As promised, the vertex shader is taken from a constant; the fragment shader is just two lines of code. Both are combined into one Program instance, which is the return value of the method.
The fragment shader requires some further elaboration, of course.
AGAL in a Nutshell
In AGAL, each line contains a simple method call.
[opcode] [destination], [argument 1], ([argument 2])
-
The first three letters are the name of the operation (
tex,add). -
The next argument defines where the result of the operation is saved.
-
The other arguments are the actual arguments of the method.
-
All data is stored in predefined registers; think of them as Vector3D instances (with properties for x, y, z and w).
There are several types of registers, e.g. for constants, temporary data or for the output of a shader. In our shader, some of them already contain data; they were set up by other methods of the filter (we’ll come to that later).
-
v0contains the current texture coordinates (varying register 0) -
fs0points to the input texture (fragment sampler 0) -
fc0contains the color offset this is all about (fragment constant 0)
The result of a fragment shader must always be a color; that color is to be stored in the oc register.
Code Review
Let’s get back to the actual code of our fragment shader. The first line reads the color from the texture:
tex ft0, v0, fs0 <2d, linear>
We’re reading the texture fs0 with the texture coordinates read from register v0, and some options (2d, linear).
The reason that the texture coordinates are in v0 is just because the standard vertex shader (STD_VERTEX_SHADER) stores them there; just trust me on this one.
The result is stored in the temporary register ft0 (remember: in AGAL, the result is always stored in the first argument of an operation).
|
Now wait a minute. We never created any texture, right? What is this? As I wrote above, a fragment filter works at the pixel level; its input is the original object, rendered into a texture.
Our base class (FilterEffect) sets that up for us; when the program runs, you can be sure that the texture sampler |
You know what, actually I’d like to change this line a little. You probably noticed the options at the end, indicating how the texture data should be interpreted. Well, it turns out that these options depend on the texture type we’re accessing. To be sure the code works for every texture, let’s use a helper method to write that AGAL operation.
tex("ft0", "v0", 0, this.texture)That does just the same (the method returns an AGAL string), but we don’t need to care about the options any longer. Always use this method when accessing a texture; it will let you sleep much better at night.
The second line is doing what we actually came here for: it adds the color offsets to the texel color.
The offset is stored in fc0, which we’ll look at shortly; that’s added to the ft0 register (the texel color we just read) and stored in the output register (oc).
add oc, ft0, fc0
That’s it with AGAL for now. Let’s have a look at the other overridden method.
beforeDraw
The beforeDraw method is executed directly before the shaders are executed. We can use them to set up all the data required by our shader.
override protected function beforeDraw(context:Context3D):void
{
    context.setProgramConstantsFromVector(Context3DProgramType.FRAGMENT, 0, _offsets);
    super.beforeDraw(context);
}
This is where we pass the offset values to the fragment shader.
The second parameter, 0, defines the register that data is going to end up in.
If you look back at the actual shader code, you’ll see that we read the offset from fc0, and that’s exactly what we’re filling up here: fragment constant 0.
The super call sets up all the rest, e.g. it assigns the texture (fs0) and the texture coordinates.
Before you ask: yes, there is also an afterDraw() method, usually used to clean up one’s resources.
But for constants, this is not necessary, so we can ignore it in this filter.
|
4.5.4. Trying it out
Our filter is ready, actually (download the complete code here)! Time to give it a test ride.
var image:Image = new Image(texture);
var filter:ColorOffsetFilter = new ColorOffsetFilter();
filter.redOffset = 0.5;
image.filter = filter;
addChild(image);
Blimey! Yes, the red value is definitely higher, but why is it now extending beyond the area of the bird!? We didn’t change the alpha value, after all!
Don’t panic. You just created your first filter, and it didn’t blow up on you, right? That must be worth something. It’s to be expected that there’s some fine-tuning to do.
It turns out that we forgot to consider "premultiplied alpha" (PMA). All conventional textures are stored with their RGB channels premultiplied with the alpha value. So, a red with 50% alpha, like this:
R = 1, G = 0, B = 0, A = 0.5
would actually be stored like this:
R = 0.5, G = 0, B = 0, A = 0.5
And we didn’t take that into account. What he have to do is multiply the offset values with the alpha value of the current pixel before adding it to the output. Here’s one way to do that:
tex("ft0", "v0", 0, texture)   // get color from texture
mov ft1, fc0                   // copy complete offset to ft1
mul ft1.xyz, fc0.xyz, ft0.www  // multiply offset.rgb with alpha (pma!)
add  oc, ft0, ft1              // add offset, copy to output
As you can see, we can access the xyzw properties of the registers to access individual color channels (they correspond with our rgba channels).
What if the texture is not stored with PMA?
The tex method makes sure that we always receive the value with PMA, so no need to worry about that.
|
Second Try
When you give the filter another try now (complete code: ColorOffsetFilter.as), you’ll see correct alpha values:
Congratulations!
You just created your first filter, and it works flawlessly.
(Yes, you could have just used Starling’s ColorMatrixFilter instead — but hey, this one is a tiny little bit faster, so it was well worth the effort.)
If you’re feeling brave, you could now try to achieve the same with a mesh style instead. It’s not that different, promised!
4.6. Custom Styles
Now that we have tapped the raw power of Stage3D, let’s continue on this road! In this section, we will write a simple mesh style. In Starling 2, all rendering is done through styles; by creating your own style, you can create special effects without sacrificing performance in any way.
| Before you continue, please make sure you have read through the section Custom Filters, as well. Filters and styles share many concepts, so it makes sense to start with the simpler of the two. Below, I’ll assume that you are familiar with everything that’s shown in that other section. |
4.6.1. The Goal
The goal is just the same as the one we were shooting for with the ColorOffsetFilter; we want to allow adding an offset to the color value of every rendered pixel. Only this time, we’re doing it with style! We’ll call it … ColorOffsetStyle.
Before we continue, it’s crucial that you understand the difference between a filter and a style.
Filters vs. Styles
As mentioned before, a filter works on a per-pixel-level: the object is rendered into a texture, and the filter processes that texture in some way. A style, on the other hand, has access to all the original geometry of the object, or to be more precise: to the object’s vertices.
While that limits styles in some ways (e.g. you can’t achieve a blur effect with a style), it makes them much more efficient. First, because you don’t need that first step of drawing the object into a texture. Second, and most importantly: this allows styled meshes to be batched.
As you know, keeping the number of draw calls down is very important for a high frame rate. To make sure that happens, Starling batches as many objects together as possible before drawing them. Question is, how to decide which objects may be batched together? This is where the style comes into play: only objects with the same style can be batched together.
If you add three images to the stage that have a ColorOffsetFilter applied to them, you’ll see at least three draw calls. Add three objects with a ColorOffsetStyle instead, and you’ll have just one. That makes styles a little more difficult to write — but that’s also what makes it worth the effort!
4.6.2. Extending MeshStyle
The base class for all styles is starling.styles.MeshStyle.
This class provides all the infrastructure we need. Let’s look at a stub first:
public class ColorOffsetStyle extends MeshStyle
{
    public static const VERTEX_FORMAT:VertexDataFormat =
            MeshStyle.VERTEX_FORMAT.extend("offset:float4");

    private var _offsets:Vector.<Number>;

    public function ColorOffsetStyle(
        redOffset:Number=0, greenOffset:Number=0,
        blueOffset:Number=0, alphaOffset:Number=0):void
    {
        _offsets = new Vector.<Number>(4, true);
        setTo(redOffset, greenOffset, blueOffset, alphaOffset);
    }

    public function setTo(
        redOffset:Number=0, greenOffset:Number=0,
        blueOffset:Number=0, alphaOffset:Number=0):void
    {
        _offsets[0] = redOffset;
        _offsets[1] = greenOffset;
        _offsets[2] = blueOffset;
        _offsets[3] = alphaOffset;

        updateVertices();
    }

    override public function copyFrom(meshStyle:MeshStyle):void
    {
        // TODO
    }

    override public function createEffect():MeshEffect
    {
        return new ColorOffsetEffect();
    }

    override protected function onTargetAssigned(target:Mesh):void
    {
        updateVertices();
    }

    override public function get vertexFormat():VertexDataFormat
    {
        return VERTEX_FORMAT;
    }

    private function updateVertices():void
    {
        // TODO
    }

    public function get redOffset():Number { return _offsets[0]; }
    public function set redOffset(value:Number):void
    {
        _offsets[0] = value;
        updateVertices();
    }

    // the other offset properties need to be implemented accordingly.

    public function get/set greenOffset():Number;
    public function get/set blueOffset():Number;
    public function get/set alphaOffset():Number;
}
That’s our starting point. You’ll see that there’s already going on a little more than in our initial filter class from the last example. So let’s have a look at the individual parts of that code.
Vertex Formats
The first thing that’s notable is the vertex format constant at the very top of the class. I mentioned already that styles work on a vertex level, giving you access to all the geometry of an object. The VertexData class stores that geometry, but we never actually discussed how that class knows which data is stored in this class, and how. That’s defined by the VertexDataFormat.
The default format used by MeshStyle is the following:
position:float2, texCoords:float2, color:bytes4
The syntax of this string should seem familiar; it’s a list of attributes with certain data types.
-
The
positionattribute stores two floats (for the x- and y-coordinates of a vertex). -
The
texCoordsattribute stores two floats, as well (for the texture coordinates of the vertex). -
The
colorattribute stores four bytes for the color of the vertex (one byte for each channel).
A VertexData instance with this format will store those attributes for each vertex of the mesh, using the exact same order as in the format string. This means that each vertex will take up 20 bytes (8 + 8 + 4).
When you create a mesh and don’t assign any style in particular, it will be rendered by the standard MeshStyle, forcing exactly this format onto its vertices. That’s all the information you need to draw a textured, colored mesh, after all.
But for our ColorOffsetStyle, that’s not enough: we need to store our color offset as well.
Thus, we need to define a new format that adds an offset attribute consisting of four float values.
MeshStyle.VERTEX_FORMAT.extend("offset:float4");
// => position:float2, texCoords:float2, color:bytes4, offset:float4
Now, you may ask: Why do we need this? The filter worked just fine without a custom vertex format, after all.
That’s a very good question, I’m glad you ask! The answer lies in Starling’s batching code. When we assign our style to some subsequent meshes, they will be batched together — that’s the whole reason we make this effort, right?
But what does batching mean? It just means that we’re copying the vertices of all individual meshes to one bigger mesh and render that. Somewhere inside Starling’s rendering internals, you’ll find code that will look similar to this:
var batch:Mesh = new Mesh();

batch.add(meshA);
batch.add(meshB);
batch.add(meshC);

batch.style = meshA.style; // ← !!!
batch.render();
Do you see the problem? The big mesh (batch) receives a copy of the style of the mesh that was first added.
Those three styles will probably use different settings, though.
If those settings are just stored in the style, all but one will be lost on rendering.
Instead, the style must store its data in the VertexData of its target mesh!
Only then will the big batch mesh receive all the offsets individually.
| Since it’s so important, I’ll rephrase that: A style’s settings must always be stored in the target mesh’s vertex data. |
Per convention, the vertex format is always accessible as a static constant in the style’s class, and also returned by the vertexFormat property.
When the style is assigned to a mesh, its vertices will automatically be adapted to that new format.
When you have understood that concept, you’re already halfway through all of this. The rest is just updating the code so that the offset is read from the vertex data instead of fragment constants.
But I’m getting ahead of myself.
Member Variables
You’ll note that even though I just insisted that all data is to be stored in the vertices, there’s still a set of offsets stored in a member variable:
private var _offsets:Vector.<Number>;That’s because we want developers to be able to configure the style before it’s assigned to a mesh.
Without a target object, there’s no vertex data we could store these offsets in, right?
So we’ll use this vector instead.
As soon as a target is assigned, the values are copied over to the target’s vertex data (see onTargetAssigned).
copyFrom
During batching, styles sometimes have to be copied from one instance to another (mainly to be able to re-use them without annoying the garbage collector).
Thus, it’s necessary to override the method copyFrom.
We’ll do that like this:
override public function copyFrom(meshStyle:MeshStyle):void
{
    var colorOffsetStyle:ColorOffsetStyle = meshStyle as ColorOffsetStyle;
    if (colorOffsetStyle)
    {
        for (var i:int=0; i<4; ++i)
            _offsets[i] = colorOffsetStyle._offsets[i];
    }

    super.copyFrom(meshStyle);
}
This is rather straight-forward; we just check if the style we’re copying from has the correct type and then duplicate all of its offsets on the current instance. The rest is done by the super-class.
createEffect
This looks very familiar, right?
override public function createEffect():MeshEffect
{
    return new ColorOffsetEffect();
}
It works just like in the filter class; we return the ColorOffsetEffect we’re going to create later.
No, it’s not the same as the one used in the filter (since the offset values are read from the vertices), but it would be possible to create an effect that works for both.
onTargetAssigned
As mentioned above, we need to store our offsets in the vertex data of the target mesh. Yes, that means that each offset is stored on all vertices, even though this might seem wasteful. It’s the only way to guarantee that the style supports batching.
When the filter is assigned a target, this callback will be executed — that is our cue to update the vertices.
We’re going to do that again elsewhere, so I moved the actual process into the updateVertices method.
override protected function onTargetAssigned(target:Mesh):void
{
    updateVertices();
}

private function updateVertices():void
{
    if (target)
    {
        var numVertices:int = vertexData.numVertices;
        for (var i:int=0; i<numVertices; ++i)
            vertexData.setPoint4D(i, "offset",
                _offsets[0], _offsets[1], _offsets[2], _offsets[3]);

        setRequiresRedraw();
    }
}
You might wonder where that vertexData object comes from.
As soon as the target is assigned, the vertexData property will reference the target’s vertices (the style itself never owns any vertices).
So the code above loops through all vertices of the target mesh and assigns the correct offset values, ready to be used during rendering.
4.6.3. Extending MeshEffect
We’re done with the style class now — time to move on to the effect, which is where the actual rendering takes place. This time, we’re going to extend the MeshEffect class. Remember, effects simplify writing of low-level rendering code. I’m actually talking about a group of classes with the following inheritance:
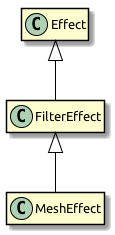
The base class (Effect) does only the absolute minimum: it draws white triangles. The FilterEffect adds support for textures, and the MeshEffect for color and alpha.
| Those two classes could also have been named TexturedEffect and ColoredTexturedEffect, but I chose to baptize them with their usage in mind. If you create a filter, you need to extend FilterEffect; if you create a mesh style, MeshEffect. |
So let’s look at the setup of our ColorOffsetEffect, with a few stubs we’re filling in later.
class ColorOffsetEffect extends MeshEffect
{
    public  static const VERTEX_FORMAT:VertexDataFormat =
        ColorOffsetStyle.VERTEX_FORMAT;

    public function ColorOffsetEffect()
    { }

    override protected function createProgram():Program
    {
        // TODO
    }

    override public function get vertexFormat():VertexDataFormat
    {
        return VERTEX_FORMAT;
    }

    override protected function beforeDraw(context:Context3D):void
    {
        super.beforeDraw(context);
        vertexFormat.setVertexBufferAt(3, vertexBuffer, "offset");
    }

    override protected function afterDraw(context:Context3D):void
    {
        context.setVertexBufferAt(3, null);
        super.afterDraw(context);
    }
}
If you compare that with the analog filter effect from the previous tutorial, you’ll see that all the offset properties were removed; instead, we’re now overriding vertexFormat, which ensures that we are using the same format as the corresponding style, ready to have our offset values stored with each vertex.
beforeDraw & afterDraw
The beforeDraw and afterDraw methods now configure the context so that we can read the offset attribute from the shaders as va3 (vertex attribute 3).
Let’s have a look at that line from beforeDraw:
vertexFormat.setVertexBufferAt(3, vertexBuffer, "offset");That’s equivalent to the following:
context.setVertexBufferAt(3, vertexBuffer, 5, "float4");That third parameter (5 → bufferOffset) indicates the position of the color offset inside the vertex format, and the last one (float4 → format) the format of that attribute.
So that we don’t have to calculate and remember those values, we can ask the vertexFormat object to set that attribute for us.
That way, the code will continue to work if the format changes and we add, say, another attribute before the offset.
Vertex buffer attributes should always be cleared when drawing is finished, because following draw calls probably use a different format.
That’s what we’re doing in the afterDraw method.
createProgram
It’s finally time to tackle the core of the style; the AGAL code that does the actual rendering. This time, we have to implement the vertex-shader as well; it won’t do to use a standard implementation, because we need to add some custom logic. The fragment shader, however, is almost identical to the one we wrote for the filter. Let’s take a look!
override protected function createProgram():Program
{
    var vertexShader:String = [
        "m44 op, va0, vc0", // 4x4 matrix transform to output clip-space
        "mov v0, va1     ", // pass texture coordinates to fragment program
        "mul v1, va2, vc4", // multiply alpha (vc4) with color (va2), pass to fp
        "mov v2, va3     "  // pass offset to fp
    ].join("\n");

    var fragmentShader:String = [
        tex("ft0", "v0", 0, texture) +  // get color from texture
        "mul ft0, ft0, v1",             // multiply color with texel color
        "mov ft1, v2",                  // copy complete offset to ft1
        "mul ft1.xyz, v2.xyz, ft0.www", // multiply offset.rgb with alpha (pma!)
        "add oc, ft0, ft1"              // add offset, copy to output
    ].join("\n");

    return Program.fromSource(vertexShader, fragmentShader);
}
To understand what the vertex-shader is doing, you first have to understand the input it’s working with.
-
The
varegisters ("vertex attribute") contain the attributes from the current vertex, taken from the vertex buffer. They are ordered just like the attributes in the vertex format we set up a little earlier:va0is the vertex position,va1the texture coordinates,va2the color,va3the offset. -
Two constants are the same for all our vertices:
vc0-3contain the modelview-projection matrix,vc4the current alpha value.
The main task of any vertex shader is to move the vertex position into the so-called "clip-space".
That’s done by multiplying the vertex position with the mvpMatrix (modelview-projection matrix).
The first line takes care of that, and you’ll find it in any vertex shader in Starling.
Suffice it to say that it is responsible for figuring out where the vertex is ending up on the screen.
Otherwise, we’re more or less just forwarding data to the fragment shader via the "varying registers" v0 - v2.
The fragment shader is an almost exact replica of its filter-class equivalent.
Can you find the difference?
It’s the register we’re reading the offset from; before, that was stored in a constant, now in v2.
4.6.4. Trying it out
There you have it: we’re almost finished with our style! Let’s give it a test-ride. In a truly bold move, I’ll use it on two objects right away, so that we’ll see if batching works correctly.
var image:Image = new Image(texture);
var style:ColorOffsetStyle = new ColorOffsetStyle();
style.redOffset = 0.5;
image.style = style;
addChild(image);

var image2:Image = new Image(texture);
image2.x = image.width;
var style2:ColorOffsetStyle = new ColorOffsetStyle();
style2.blueOffset = 0.5;
image2.style = style2;
addChild(image2);
Hooray, this actually works! Be sure to look at the draw count at the top left, which is an honest and constant "1".
There’s a tiny little bit more to do, though; our shaders above were created assuming that there’s always a texture to read data from. However, the style might also be assigned to a mesh that doesn’t use any texture, so we have to write some specific code for that case (which is so simple I’m not going to elaborate on it right now).
The complete class, including this last-minute fix, can be found here: ColorOffsetStyle.as.
4.6.5. Where to go from here
That’s it with our style! I hope you’re as thrilled as I am that we succeeded on our task. What you see above is the key to extending Starling in ways that are limited only by your imagination. The MeshStyle class even has a few more tricks up its sleeve, so be sure to read through the complete class documentation.
I’m looking forward to seeing what you come up with!
4.7. Distance Field Rendering
As mentioned multiple times, bitmap fonts are the fastest way to render text in Starling. However, if you need to display text in multiple sizes, you will soon discover that bitmap fonts do not scale well. Scaling up makes them blurry, scaling down introduces aliasing problems. Thus, for best results, one has to embed the font in all the sizes used within the application.
Distance Field Rendering solves this issue: it allows bitmap fonts and other single-color shapes to be drawn without jagged edges, even at high magnifications. The technique was first introduced in a SIGGRAPH paper by Valve Software. To support this feature, Starling contains a special MeshStyle implementation.
To understand how it works, I will start by showing you how to use it on a single image. This could e.g. be an icon you want to use throughout your application.
4.7.1. Rendering a single Image
We had plenty of birds in this manual already, so let’s go for a predator this time! My cat qualifies for the job. I’ve got her portrait as a black vector outline, which is perfect for this use-case.

Unfortunately, Starling can’t display vector images; we need Seven as a bitmap texture (PNG format).
That works great as long as we want to display the cat in roughly the original size (scale == 1).
However, when we enlarge the image, it quickly becomes blurry.
This is exactly what we can avoid by converting this image into a distance field texture.
Starling actually contains a handy little tool that takes care of this conversion process.
It’s called the "Field Agent" and can be found in the util directory of the Starling repository.
You need both Ruby and ImageMagick installed to use the field agent.
Look at the accompanying README file to find out how to install those dependencies.
The tool works both on Windows and macOS.
|
I started with a high-resolution PNG version of the cat and passed that to the field agent.
ruby field_agent.rb cat.png cat-df.png --scale 0.25 --auto-size
This will create a distance field texture with 25% of the original size. The field agent works best if you pass it a high resolution texture and let it scale that down. The distance field encodes the details of the shape, so it can be much smaller than the input texture.

The original, sharp outline of the cat has been replaced with a blurry gradient. That’s what a distance field is about: in each pixel, it encodes the distance to the closest edge in the original shape.
| This texture is actually just pure white on a transparent background; I colored the background black just so you can see the result better. |
The amount of blurriness is called spread. The field agent uses a default of eight pixels, but you can customize that. A higher spread allows better scaling and makes it easier to add special effects (more on those later), but its possible range depends on the input image. If the input contains very thin lines, there’s simply not enough room for a high spread.
To display this texture in Starling, we simply load the texture and assign it to an image. Assigning the DistanceFieldStyle will make Starling switch to distance field rendering.
var texture:Texture = assets.getTexture("cat-df");
var image:Image = new Image(texture);
image.style = new DistanceFieldStyle();
image.color = 0x0; // we want a black cat
addChild(image);
With this style applied, the texture stays perfectly crisp even with high scale values. You only see small artifacts around very fine-grained areas (like Seven’s haircut).

Depending on the "spread" you used when creating the texture, you might need to update the softness parameter to get the sharpness / smoothness you’d like to have.
That’s the first parameter of the style’s constructor.
Rule of thumb: softness = 1.0 / spread.
|
Render Modes
That’s actually just the most basic use of distance field textures. The distance field style supports a couple of different render modes; namely an outline, a drop shadow, and a glow. Those effects are all rendered in a specific fragment shader, which means that they do not require any additional draw calls. In other words, these effects are basically coming for free, performance wise!
var style:DistanceFieldStyle = new DistanceFieldStyle();
style.setupDropShadow(); // or
style.setupOutline(); // or
style.setupGlow();
Pretty cool, huh?
| The only limitation: you cannot combine two modes, e.g. to have both outline and drop shadow. You can still resort back to fragment filters for that, though. |
4.7.2. Rendering Text
The characteristics of distance field rendering make it perfect for text. Good news: Starling’s standard bitmap font class works really well with the distance field style. By now, there are even great tools for creating suitable font textures.
Remember, a bitmap font consists of an atlas-texture that contains all the glyphs and an XML file describing the attributes of each glyph. You can’t simply use field agent to convert the texture in a post-processing step (at least not easily), since each glyph requires some padding around it to make up for the spread. Therefore, it’s best to use a bitmap font tool that supports distance field textures natively.
Some of the GUI-tools I described in the Bitmap Fonts chapter can be configured to create distance field output. However, to be blunt, none of them does that job particularly well. If you are not afraid of some command line magic, I recommend another one instead.
msdf-bmfont-xml
Msdf-bmfont-xml runs on both Windows and macOS (refer to its GitHub page for installation instructions). The quality of the output is phenomenal, and it even supports an advanced type of distance field texture — we’ll look at that shortly.
For now, let’s start with the basics: let’s create a distance field font for, say, Arial.ttf:
msdf-bmfont -o arial.png -t sdf --smart-size Arial.ttf-
-o arial.pngdetermines the filename for the font texture. -
-t sdfindicates that we want to create a single-channel distance field font. All distance field textures we discussed so far were single channel textures. -
--smart-sizewill make sure the texture uses the smallest possible size.
This command will create the familiar pair of png and fnt files that you can load in your app.
What’s more, it adds an additional data element to the fnt file that contains all relevant distance field settings.
As a result, Starling is able to set everything up for you automatically.
[Embed(source="arial.fnt", mimeType="application/octet-stream")]
public static const FontXml:Class;

[Embed(source="arial.png")]
public static const FontTexture:Class;

var texture:Texture = Texture.fromEmbeddedAsset(FontTexture);
var xml:XML = XML(new FontXml());
var font:BitmapFont = new BitmapFont(texture, xml)
TextField.registerCompositor(font, font.name);

var textField:TextField = new TextField(400, 100, "May the font be with you!");
textField.format.setTo(font.name, 32);
addChild(textField);
That’s right, there is no special set-up code to write — you create font and TextField just like you always do! Behind the scenes, Starling will automatically set up a DistanceFieldStyle instance with the correct settings.
Multi-Channel Distance Field Textures
A multi-channel distance field texture uses all channels of an RGB-texture to encode the distance information. This leads to an even higher rendering quality.
As mentioned above, msdf-bmfont-xml supports this distance field type — in fact, it even defaults to it.
Please run the command-line tool again, but omit the -t sdf parameter.
msdf-bmfont -o arial.png --smart-size Arial.ttfThis time, you will end up with a multi-channel distance field texture. Here’s what it looks like:
Again, Starling will recognize the texture and will render in "multi-channel" style automatically. The reward for all this hard work: such a font can now be used at almost any scale, and with all the flexible render modes I showed above.

4.8. Summary
Pat yourself on the back: we just covered a lot of quite advanced topics.
-
You are now familiar with ATF textures, which are not only very memory efficient, but load faster than standard PNGs.
-
You know how to recover from a context loss: by relying on the AssetManager or providing your own restoration-code.
-
You’ve got a feeling about how to make sure you are not wasting any memory, and how to avoid and find memory leaks.
-
When performance becomes an issue, your first look is at the draw count. You know ways to make sure batching is not disrupted.
-
The low-level rendering code is far less frightening that you thought at first. Heck, you even wrote your own filter and style!
-
Distance field rendering is a useful technique to keep in mind for scalable fonts or other monochrome shapes.
This knowledge will save you a lot of time and trouble in any of your upcoming projects. And I bet some of them are going to have to run on mobile hardware, right …?