6. Pro Tips
Now that you know every nut, bolt and screw of the Starling API, I’d like to give you a taste of what can be achieved if it’s used the right way. What follows is a number of cookbook-like recipes that may help you out in different situations. I also threw in a few tips that apply to Flash and ActionScript in general. In short, there should be something for everybody!
| I set up a small project with working samples of most of these recipes. Find it on GitHub. |
6.1. ActionScript 3
6.1.1. Byte Arrays
The ByteArray class represents one of the lower level APIs available within the ActionScript core libraries. It allows to store data in a very efficient way, with total control over the actual bits of memory.
When working with the Stage3D API, this efficiency is very important. For example, the fastest way to upload data to the GPU is via byte arrays; thus, you’ll find them very often within the Starling source code.
If you have never used them before, here is a simple example. We are storing a couple of values and retrieving them afterwards:
var byteArray:ByteArray = new ByteArray();

byteArray.writeInt(1);
byteArray.writeInt(2);
byteArray.writeInt(3);

trace(byteArray.length); // => 12 (3 × 4 bytes)
byteArray.position = 0;

trace(byteArray.readInt()); // => 1
trace(byteArray.readInt()); // => 2
trace(byteArray.readInt()); // => 3
You might have worked with streams in other programming languages; the ByteArray class works similar to those.
There is a pointer to the current position, and whenever you read or write data, that pointer moves according to the data type.
It’s your own responsibility not to read beyond the array’s current length.
Of course, for a simple list of numbers, we could also simply use an Array or a Vector. However, byte arrays have some advantages:
-
The data types are finer grained, e.g. you can choose between 8, 16, and 32 bit integers, as well as 32 or 64 bit floats.
-
You can mix types, e.g. store integers, floats and Strings in sequence.
-
You can easily write byte arrays to disk and reload them later.
-
If used correctly, the storage overhead is very small.
Thus, the class can be really useful in some situations. However, if the main reason to use it is to save memory, you need to be really careful: its memory management strategy is rather non-intuitive.
Memory Pitfalls
When you set the length of a byte array, it will adhere to that: an array with length 12 will take up 12 bytes (plus some overhead).
When you write beyond that length, the byte array will automatically expand to be able to provide enough space.
This is an important and useful feature — and at first glance, it seems to work just as one would expect.
var byteArray:ByteArray = new ByteArray();
byteArray.length = 12;

byteArray.writeInt(1); // length = 12
byteArray.writeInt(2); // length = 12
byteArray.writeInt(3); // length = 12
byteArray.writeInt(4); // length = 16
One integer takes up 4 bytes, so that’s all just as one would expect. When writing the last integer, the array is automatically extended by 4 bytes.
Or is it?
Let’s look at the memory consumption instead of the length.
(For clarity, I subtracted the constant memory overhead of the byte array from the values below.)
var byteArray:ByteArray = new ByteArray();
byteArray.length = 12;

byteArray.writeInt(1); // getSize(byteArray) = 12
byteArray.writeInt(2); // getSize(byteArray) = 12
byteArray.writeInt(3); // getSize(byteArray) = 12
byteArray.writeInt(4); // getSize(byteArray) = 4096
Wow, what just happened? The byte array suddenly uses a whopping 4 kB of memory! What did we do wrong?
In fact, we didn’t do anything wrong.
That’s just the way byte arrays are implemented!
The first time you set the length property, the runtime will allocate exactly the required memory.
Any subsequent growth (be it manual or automatic) will inflate it to at least 4 kB.
It’s really exactly the first length assignment that counts.
If you first assign a length of 12 and then a length of 13, you will already run into the 4 kB inflation.
|
The only way to "fix" an inflated byte array is by calling its clear method.
This will reset the memory and give you a fresh start.
This doesn’t mean that byte arrays are bad — it just means that you need to be a little careful when using them:
-
Make sure to assign a large enough
lengthat the beginning. Be generous, for once! -
Consider reusing the same byte array multiple times, maybe via some kind of pool.
-
When you do not need the byte array any longer, call
clearto free the allocated memory.
Byte Arrays as String Builders
Besides numbers, one of the most used data types we developers are constantly working with is the String class. It’s a very common operation to build a string from several elements, e.g. to set up a status TextField with the player’s current stats.
Compared to many other classes of the ActionScript API, the String class is a little peculiar: it is immutable. This means that, once created, a string can never be modified in any way. For example, the following code might behave different to what you would expect:
var string:String = "";

for (var i:int=0; i<100; ++i)
    string += "x";
It looks as if there is just one String instance that is continuously growing.
In reality, though, this code creates 101 strings; each += operation returns a new one.
"", "x", "xx", "xxx", "xxxx", "xxxxx", etc.
In most cases, this is not tragic; the garbage collector can handle a few temporary objects. But when you are working on an application that’s really heavily relying on text manipulation, this might turn into a problem.
In many other standard APIs, you will thus find a StringBuilder class that helps to avoid this issue. In ActionScript, however, you won’t find a class with that name.
Don’t despair, though: the ByteArray class can handle that job! The following code achieves the same result as the previous sample, but without creating any temporary objects.
const LENGTH:int = 100;

var byteArray:ByteArray = new ByteArray();
byteArray.length = LENGTH; (1)

for (var i:int=0; i<LENGTH; ++i)
    byteArray.writeUTFBytes("x"); (2)

byteArray.position = 0;
trace(byteArray.readUTFBytes(LENGTH)); (3)| 1 | This is optional, but helps save memory (as demonstrated before). |
| 2 | Instead of creating lots of temporary objects, the contents is written into just one byte array. |
| 3 | Finally, to access the contents, reset the position and call readUTFBytes. |
Don’t overuse this technique; for building just a few short strings here and there, it’s definitely overkill. But in some scenarios, it can be worth the effort!
6.2. Display Objects
6.2.1. Touch Gestures
The support of touch input was arguably one of the main reasons for the success of the original iPhone back in 2007. Today, interacting with mobile phones with our fingers feels so natural that it’s hard to imagine it could ever have been different. Single- and multi-touch gestures have become second nature to most of us.
Since Starling applications can run on both desktop and mobile devices, it made sense to unify mouse and touch input. In both cases, you rely on the TouchEvent class, which works quite intuitively.
The only notable difference: mouse-over is handled via TouchInput.HOVER.
It is only dispatched for mouse input (when the cursor hovers over an object while the button is in "up"-state).
|
The TouchEvent and Touch classes provide all the information you need to handle any possible input. However, Starling does not have a concept of gestures or other high-level input events. You have to implement that yourself.
In the end, it’s really not very complicated, though. Below, I will guide you through the creation of a sprite that can be moved around, rotated, and scaled by the user.
| If that sounds familiar, that’s because the Starling demo contains exactly such a class. |
First, make sure that multi-touch is enabled; without it, all but one finger will be ignored. During development, it’s also useful to enable the multi-touch simulation. That way, you can use the Ctrl / Cmd and Shift keys to simulate two touch points. A huge time saver!
Starling.multitouchEnabled = true;

var starling:Starling = new Starling(Game, stage);
starling.simulateMultitouch = true;
Note that multitouchEnabled is a static property on the Starling class, while simulateMultitouch is an instance property.
|
As for the actual class, let’s make it a simple sprite that’s set up with a TouchEvent handler.
public class TouchSheet extends Sprite
{
    public function TouchSheet()
    {
        addEventListener(TouchEvent.TOUCH, onTouch); (1)
        useHandCursor = true; (2)
    }

    private function onTouch(event:TouchEvent):void
    {
        // TODO
    }
}| 1 | The event handler will detect touches on all children of the TouchSheet. |
| 2 | On mouse input, this will let the cursor change into the shape of a hand when it’s hovering over the object. |
To work with this class, you will need to add some content, of course. Otherwise, there is nothing for the user to touch and move around. For example, you could add an image:
var sheet:TouchSheet = new TouchSheet();
var image:Image = new Image(assets.getTexture("sheet"));
sheet.addChild(image);
addChild(sheet);
Single Touches
The first task: the user must be able to drag around the sprite with a single finger.
For the touch event handler, this means that we need to check how many fingers are being MOVED over the screen.
If it’s just one finger, we can add our translation (movement) logic.
var touches:Vector.<Touch> = event.getTouches(
    this, TouchPhase.MOVED); (1)

if (touches.length == 1) (2)
{
    var delta:Point = touches[0].getMovement(parent); (3)
    this.x += delta.x; (4)
    this.y += delta.y;
}| 1 | We are only interested in touches on top of this, and only in touches that are moving.
It’s not relevant to us if a touch just started or ended, for example. |
| 2 | Movement logic is triggered when there is exactly one finger on the screen. |
| 3 | The getMovement method returns exactly what we need: the movement vector of the finger during the last frame.
Note that we ask for the movement in the parent coordinate system: that’s because x and y are actually always referring to the parent coordinate system. |
| 4 | With this information, we can update the x and y coordinates of the sprite accordingly. |
That’s all quite straight-forward, right?
The getMovement method makes this really simple.
Multiple Touches
The gestures that involve two fingers require a little more work. Let’s start with the pinch gesture; it allows the user to scale the object.
else if (touches.length == 2)
{
    var touchA:Touch = touches[0]; (1)
    var touchB:Touch = touches[1];

    var currentPosA:Point  = touchA.getLocation(parent); (2)
    var previousPosA:Point = touchA.getPreviousLocation(parent);
    var currentPosB:Point  = touchB.getLocation(parent);
    var previousPosB:Point = touchB.getPreviousLocation(parent);

    var currentVector:Point  = currentPosA.subtract(currentPosB); (3)
    var previousVector:Point = previousPosA.subtract(previousPosB);

    // scale
    var scaleDiff:Number = currentVector.length / previousVector.length; (4)
    this.scale *= scaleDiff;
}| 1 | For easy access, save references to the two Touch instances. |
| 2 | For both fingers, store the current and previous positions (again, in the parent coordinate system). |
| 3 | Calculate the distance vectors between the two fingers, both in the current and the previous frame. |
| 4 | Has the distance between the two fingers become bigger or smaller? The ratio between the new length and the old length represents the change of the object scale. |
As you can see, the actual logic is rather trivial — but we need to extract a lot of data out of the Touch instances. Some of those values can be reused right away, for the rotation logic.
var currentAngle:Number  = Math.atan2(currentVector.y, currentVector.x); (1)
var previousAngle:Number = Math.atan2(previousVector.y, previousVector.x);

var angleDiff:Number = currentAngle - previousAngle; (2)
this.rotation += angleDiff;| 1 | Calculate the angle of the vector that’s spawned up between the two fingers, both in the current and the previous frame. |
| 2 | The difference between the new angle and the old angle represents the change of the object’s rotation. |
|
If you ever asked yourself why Starling uses radians instead of degrees for the |
With that code, the sprite will rotate whenever the user moves two fingers in opposite directions. However, no matter where you touch the object, it always rotates around the sprite’s origin — that’s not exactly what one would expect. Instead, it should rotate around the midpoint of the two fingers.
The easiest way to handle that: move the object’s pivot point to that midpoint. As a side effect, this code will make sure that translations work with both fingers, as well.
var previousLocalA:Point  = touchA.getPreviousLocation(this); (1)
var previousLocalB:Point  = touchB.getPreviousLocation(this);

this.pivotX = (previousLocalA.x + previousLocalB.x) * 0.5; (2)
this.pivotY = (previousLocalA.y + previousLocalB.y) * 0.5;

this.x = (currentPosA.x + currentPosB.x) * 0.5; (3)
this.y = (currentPosA.y + currentPosB.y) * 0.5;| 1 | We start by getting the previous touch locations in the local coordinate system.
Local, because both pivotX and pivotY are defined in local coordinates. |
| 2 | The pivot point is updated based on the previous midpoint. |
| 3 | The position, on the other hand, is updated based on the current midpoint in parent coordinates. |
We use the data from the previous frame to get the location of the pivot point; that tells us which "handle" the user is manipulating. The data from the current frame is then used to figure out where that handle has been moved to.
That concludes our gesture handler! The TouchSheet object can now be moved around on the screen naturally.
|
Avoiding Temporary Objects
To keep it simple, the code above uses the Point instances returned by the helper methods of the Touch class. The side effect: each time the code is executed, several temporary objects will be created. To avoid that, you can use Starling’s Pool class. For example: In Starling, you will find many methods that support an optional |
6.2.2. Anti-Aliasing Strategies
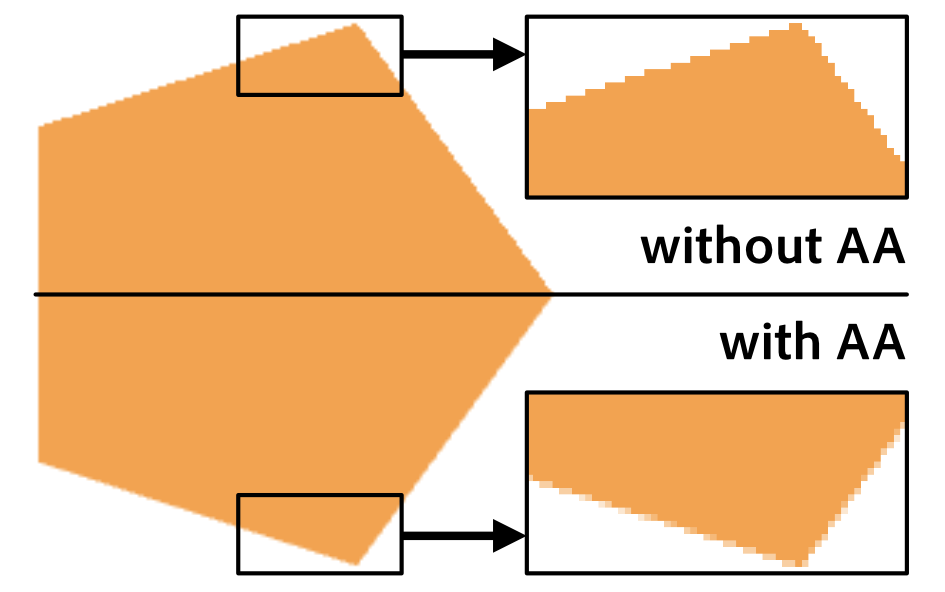
Aliasing is one of those annoying topics that always pop up once in a while when you deal with computer graphics. Shapes with mathematically exact bounds need to be approximated with the limited numbers of pixels on a computer screen — and that leads to jagged edges.
The problem has become less pressing in recent years, though, since the density of today’s screens has reached a very high level (especially on mobile). For some reason, however, the big screens of desktop computers follow suit only very slowly. Thus, it’s still important to be familiar with some strategies around this issue.
As a Starling user, you have several options.
Full-screen Anti-Aliasing
The most straight-forward approach: activate antiAliasing on the Starling instance.
starling.antiAliasing = 2;This will make Stage3D render a number of sub-samples for each pixel; the average of these sub-samples is then drawn to the back buffer.
The following table shows the number of sub-samples produces by each possible antiAliasing value:
| Value | Effect |
|---|---|
0 |
No Anti-Aliasing (the default). |
1 |
2 subsamples; minimal anti-aliasing. |
2 |
4 subsamples; decent anti-aliasing. |
3 |
8 subsamples; high-quality anti-aliasing. Only available on desktop. |
4 |
16 subsamples: very high-quality anti-aliasing. Only available on desktop. |
As you can see, values of 3 and 4 are currently only supported on desktop.
That shouldn’t be any cause for concern, though; a value of 2 is totally sufficient for most use-cases.
A bigger limitation is that, among mobile systems, full-screen anti-aliasing is currently only available on iOS (using AIR 24 and above). At the time of this writing, any anti-aliasing settings are completely ignored on Android.
But don’t despair: there is an alternative. The Stage3D API allows you to activate anti-aliasing on RenderTextures instead. In this context, it works on all platforms (starting with AIR 22). As we will learn next, it is very easy to take advantage of that in Starling.
Selective Anti-Aliasing
The full-screen approach I just described is not always optimal. We just heard that it’s currently not available on Android; furthermore, it’s extremely expensive. To calculate four subsamples, the GPU has to render four times as many pixels — that will push many mobile devices beyond their limits.
So it might be smarter to enable anti-aliasing only for specific display objects. For example, if most of the display objects with aliasing issues are part of just one sprite, why enable sub-sampling for the complete screen? Instead, focus your efforts on just this sprite by making use of Starling’s FragmentFilter class.
sprite.filter = new FragmentFilter();
sprite.filter.antiAliasing = 2;
That’s all you need to do!
The FragmentFilter class seems rather useless on first glance. Being the base class of all filters, it just renders a display object into a texture without modifying it. In this specific case, this is exactly what we need! The class will automatically handle all the elaborate "render-to-texture" stuff for us, including anti-aliasing.
Yes, you could also do that manually with the help of a RenderTexture, but the filter is much easier to use. Besides, since filters are highly optimized, that approach is even more efficient.
Anti-Aliasing via Linear Sampling
You might have run into this problem: you rotate an Image or Quad just slightly, and suddenly the edges become extremely jagged. However — did you notice? — inside the image, the texture is not jagged at all. Why is that?
By default, when sampling a texture, the GPU calculates the weighted average of the four pixels surrounding the exact coordinates you are looking up. That’s why an image becomes blurry (not pixelated) when you scale it by a big factor. Since GPUs are doing texture lookups so often, they are extremely efficient at it. We can make use of that!
The solution is really simple: we extend the texture slightly so that it is surrounded by a small transparent border. Now, suddenly, the edge is processed via linear sampling, as well — and the jagged pixels are smoothed out. This is, hands down, the cheapest way to fight aliasing!

| Some texture atlas generators will detect transparent borders around textures and crop them away to save texture memory. Make sure that this does not happen for any textures you have deliberately equipped with such a border. |
6.2.3. Fun with Filters
We just saw that the FragmentFilter class can be used for selectively applying anti-aliasing to an object. Actually, for a class that doesn’t seem to do anything on first glance, there are a lot of creative ways to make use of it! I’d like to show you two more.
CacheAsBitmap
In the classic Flash display list API, the property cacheAsBitmap allows you to cache the internal bitmap representation of a display object.
This can increase performance for display objects that contain complex vector content.
Well, Starling does not provide much vector drawing capabilities, but there are still cases where it makes sense to replace a display object with a flat bitmap. For example, you might have a container that requires several draw calls, but changes only very rarely. By rendering the complete container into a texture, you can replace all those draw calls with a single one (rendering just the one texture).
To achieve this, you could use a RenderTexture, alright. However, that would actually mean a lot of effort, and the underlying display objects wouldn’t respond to touch events any longer.
Instead, it’s much easier to assign a FragmentFilter instance to the object, with its cache enabled.
var object:Sprite = getComplexContent();
object.filter = new FragmentFilter();
object.filter.cache();
Different to cacheAsBitmap, the cache will remain completely unchanged even if objects within the container change.
Its contents are only recreated when you call cache() again or change any filter settings.
Even if you don’t call cache(), the filter will cache its output as long as the object and its parents do not change their position and orientation.
|
BlendMode.LAYER
It’s quite frequent that an object is composed of lots of small elements. A TextField that uses a bitmap font consists of numerous glyphs; a game character might consist of multiple limbs that are animated separately.
If those elements overlap, something unexpected happens when you change the container’s alpha value. Instead of becoming translucent as a whole, all the individual elements will become translucent individually. The effect is that you start to see each individual element of the container.
The reason: when you change a container’s alpha value, you’re effectively just telling Starling that all its children must be rendered with that alpha. That’s probably not what you wanted.
In classic Flash, this could be solved by assigning a special blend mode: LAYER.
That mode is not available in Starling; however, you can achieve the same result by different means.
You probably already guessed it, right? Once again, we are pulling the FragmentFilter class out of the hat.
var object:Sprite = getComplexContent();
object.filter = new FragmentFilter();
object.alpha = 0.7;
The picture below shows the difference the filter makes. On the left, you see the individual glyphs shining through; on the right, the object becomes translucent as a whole.

You can even combine this trick with the cacheAsBitmap alternative I introduced just a moment ago.
That way, rendering the composed object becomes even cheaper.
|
6.2.4. Fast Tilemaps
Many 2D games contain big maps, like the levels in a platformer or a territory of a real-time strategy title. Most of the time, those maps are assembled from lots and lots of small tiles — rectangular textures that can be seamlessly put next to each other.

The traditional approach to implement such a tilemap would be to simply use an Image instance for each tile. If you add all tiles to a single Sprite, you’ll have a handy and easy to use object representing the whole map.
That works well, and it’s even the preferred approach for small maps. It’s straight-forward, flexible, and comfortable to use.
Performance-wise, though, it’s not ideal. The flexibility of the display list comes at a price; when the number of tiles grows too big, performance will suffer.
However, Starling allows you to side-step the display list. You can create a single display object that’s composed of all your tiles but is rendered in a single step. The class that can pull this off is called MeshBatch.
|
In fact, all rendering in Starling is done via MeshBatches. Each frame, when Starling iterates over the display list, it will fill a number of batches. The "draw call" count mentioned numerous times in this book — that’s simply the number of batches being rendered. Being of such importance, you can imagine that a lot of time was spent to optimize the hell out of that class! |
When using the MeshBatch, think of it as an object similar to a RenderTexture. You can add ("draw") an almost endless number of other meshes to it (up to 16k quads). However, whereas the RenderTexture stores the pixels that are the result of this operation, the MeshBatch stores the actual geometry. Thus, a MeshBatch requires only very little memory, and adding additional geometry is much cheaper.
Enough theory: let’s look at how to create a big tilemap with the MeshBatch class.
const TILE_SIZE:int = 16;

var map:MeshBatch = new MeshBatch(); (1)
var tiles:Vector.<Texture> = assets.getTextures("tile_"); (2)
var tile:Image = new Image(tiles[0]); (3)
var numTiles:int = tiles.length;

for (var x:int=0; x<100; ++x) (4)
{
    for (var y:int=0; y<100; ++y)
    {
        tile.texture = tiles[int(Math.random() * numTiles)]; (5)
        tile.x = x * TILE_SIZE;
        tile.y = y * TILE_SIZE;
        map.addMesh(tile); (6)
    }
}

addChild(map); (7)| 1 | Instantiate the MeshBatch. |
| 2 | The tile textures must all be taken from the same texture atlas. |
| 3 | A single Image will act as the blueprint for all tiles. |
| 4 | We create a tile map of 100×100 tiles. |
| 5 | In each loop cycle, the image is assigned a random tile texture. |
| 6 | The image is added to the batch at the given x- and y-coordinates. |
| 7 | The result: map is a single display object to be used just like a regular Mesh or Image. |
What may be surprising about this code is that a single Image instance (tile) is added to the MeshBatch over and over.
You couldn’t do that with a regular container (e.g. a Sprite): it can pick up a single image once and only once.
When you add an object to a MeshBatch, its geometry and other properties are simply copied over; the object acts only as a blueprint or stamp. That’s exactly what distinguishes this class.
Even after the code has been executed, the tile image is not part of the display list.
|
You probably won’t be shocked to hear that this performance benefit comes at a price, and that’s a set of rather strict limitations.
-
You can only add objects of type Mesh or its subclasses (like Quad and Image).
-
All added meshes must use the same texture (read: atlas) and have an identical style.
-
The very first object you add to the batch determines its attributes (texture, smoothing, etc). If you add an incompatible object later, its geometry will be interpreted wrongly; you won’t get any exception.
-
You cannot remove individual objects from the batch. However, you can trim it to a certain length, overwrite specific vertex data, or reset the batch altogether.
All in all, the MeshBatch is not the silver bullet for all performance-problems, but it’s a great tool for very specific use-cases. For example, Starling uses them internally for bitmap fonts.
6.3. Textures
6.3.1. Tilemap Glitches
If you followed the last section and just created your tilemap, you might have run into a problem: in some situations, the tile edges become visible. Like here:

It doesn’t seem to make any sense, because you perfectly aligned the objects next to each other, and each tile ends with the same flat color. Still, in some moments, the edges become visible — how can that be?
That’s an issue you will run into with almost all GPU-powered graphics engines.
To get to the root of the problem, let’s look at the edge of a single tile in great magnification.
We should also turn off textureSmoothing.
tile = new Image(tileTexture);
tile.textureSmoothing = TextureSmoothing.NONE;
On the left, you see a corner of the magnified tile with texture smoothing disabled, making the actual pixel bounds visible.
On the right, the same corner is drawn with the default texture smoothing (BILINEAR).
The actual pixel bounds are highlighted with a grid.
As you can see, the further you get to the edges, the brighter the pixels become. That’s exactly the reason our tiles do not line up seamlessly! Where is that light green color coming from?
By default, Starling uses "bilinear filtering" for all texture lookups. That means that each time the GPU samples a texture, it takes four of its pixels into account.
For example, in the corner area, each texture lookup will combine all texels marked with "×". This means that we are actually reaching beyond the bounds of the tile! Since the tile was probably taken from a texture atlas, we’re talking about empty space or even adjacent tiles.
Don’t think that you’re safe if you don’t magnify the tiles, by the way. If the tiles are not perfectly aligned with the screen pixels, the same problem will occur.
However, now that we know what’s causing the problem, we can do something about it. Here are a few workarounds that will fix your tile maps.
-
Draw the tiles with
TextureSmoothing.NONE. If you need to zoom in on the tiles, though, gaps might still reappear. -
Activate
pixelSnappingfor each tile. Again, this does not help in all cases: scaling or rotating is out of the question. -
Extrude the tile textures, i.e. repeat the border pixels all around. This is my recommendation, and it will fix the issue almost universally. With atlas generators like TexturePacker, this is just a matter of turning a switch.
That should do it!

6.3.2. Loading Textures asynchronously
When an app or game uses just a moderate number of textures, you can load everything at launch (maybe while showing a short loading animation). Often, though, the size and amount of textures will be too big to fit everything into memory simultaneously. In that case, you have to load textures on demand, right when you need them.
The problem: by default, loading happens synchronously, causing a hiccup while the texture is being uploaded to graphics memory. Especially when the texture is big (think: texture atlas), that pause will be noticeable.
The solution is to load textures asynchronously instead. That way, the runtime will create the texture in a separate thread, leaving Starling in a responsive state.
ATF Textures
Stage3D has always supported asynchronous loading of ATF textures. It works like this:
var atfBytes:ByteArray = loadAtfData(); (1)
Texture.fromAtfData(atfBytes, 1, true, (2)
    function(texture:Texture):void (3)
    {
        var image:Image = new Image(texture);
        addChild(image);
});| 1 | The actual data may be embedded or be loaded from an URL. |
| 2 | The ByteArray is passed to Texture.fromAtfData (parameters 2 and 3 set up scale factor and mipmap support.). |
| 3 | If the final parameter is a function, the method will switch to asynchronous loading. The texture is ready as soon as the function is called. |
| You must not use the texture before the callback is executed. |
The ATF format guarantees economical memory usage, so it is often a great choice. On the other hand, it’s not perfectly suited for all kinds of textures.
Bitmap Textures
That’s why AIR 24 finally added asynchronous texture loading for standard bitmap textures. Beginning with Starling 2.2, you can make use of this feature in your games and apps.
| AIR 24 supports asynchronous texture upload only for mobile targets. For desktop support, you need to use at least AIR 27. |
The code looks quite similar!
var bitmap:Bitmap = loadBitmap(); (1)
Texture.fromBitmap(
    bitmap, false, false, 1.0, "bgra", false, (2)
    function(texture:Texture):void (3)
    {
        var image:Image = new Image(texture);
        addChild(image);
});| 1 | Again, the data might be embedded or loaded from an URL. |
| 2 | Annoyingly, you need to pass a lot of parameters to the factory method.
You can use the default values for most of them (except maybe for the scale parameter). |
| 3 | The asynchronous callback works just like the one for ATF textures. |
All in all, the whole process is almost identical to how it’s done for ATF textures.
When you create the bitmap from a JPG or PNG file, you might still notice a small hiccup, though. That’s because the runtime has to decode the file — another synchronous process. It’s possible to optimize that part of the loading process, too, by setting up the correct ImageDecodingPolicy.
var context:LoaderContext = new LoaderContext(); (1)
context.imageDecodingPolicy = ImageDecodingPolicy.ON_LOAD; (2)

var loader:Loader = new Loader(); (3)
loader.contentLoaderInfo.addEventListener(Event.COMPLETE, onComplete);
loader.load(new URLRequest("http://i.imgur.com/4ISGbAZ.jpg"), context); (4)

function onComplete(event:Object):void
{
    var bitmap:Bitmap = event.target.content as Bitmap;
    // ...
}| 1 | The LoaderContext defines options that indicate how a file should be loaded. |
| 2 | For our cause, we set the ImageDecodingPolicy to ON_LOAD.
That will optimize the decoding process (at the price of a slightly higher memory consumption). |
| 3 | The actual loading is handled by the Loader class. |
| 4 | Note that context is passed to the load method. |
If you load the bitmap that way and convert it to a texture with the async-callback shown above, you will have the smoothest possible result, even for a big atlas texture.
| The AssetManager makes use of these best practices, too. Thus, you can also simply rely on that class to load your textures; the results should be similar. |
6.3.3. Runtime Texture Compression
As discussed in previous chapters, the ATF format provides a practical way to reduce the memory consumption of your assets. Typically, you create the ATF files during the build process of your game and then load them at runtime. What’s not so well known is that you can also create compressed textures at runtime — albeit only on desktop platforms (at the time of this writing).
Most of the time, you will still want to compress your textures beforehand — simply because it is faster and allows for more control. In some situations, on the other hand, this feature can turn out really useful, e.g. when creating textures dynamically from vector art.
Here is a source code sample showing how it’s done.
var bitmap:Bitmap = getDynamicBitmap();
var texture:Texture = Texture.fromBitmap(bitmap,
    false, false, 1, Context3DTextureFormat.COMPRESSED);
Quite simple, right?
The parameter that’s interesting is the last one; for compressed textures, you can choose between the format COMPRESSED and COMPRESSED_ALPHA.
As the names suggests, only the latter will include an alpha channel.
| Different to standard ATF textures, you don’t necessarily need to make sure the bitmap has side lengths that are powers of two; Starling will take care of this requirement internally. |
I couldn’t find any information about the actual format that is used for the compression, but it’s likely to be either DXT1 (no alpha) or DXT5 (alpha), since those are available on all desktop computers.
You are probably using the AssetManager to load your textures, right? In that case, you can activate texture compression by simply assigning the appropriate format before enqueuing:
var assets:AssetManager = new AssetManager();

// enqueue textures to be compressed
assets.textureOptions.format = Context3DTextureFormat.COMPRESSED_ALPHA;
assets.enqueue(/* ... */);

// continue with standard format
assets.textureOptions.format = Context3DTextureFormat.BGRA;
assets.enqueue(/* ... */);
If you wonder how long the compression takes, fear not: it’s definitely within an acceptable range. I made some tests with a MacBook Pro from 2015, which compressed a 2048×2048 texture in less than 100 milliseconds. Even on a low-end Windows Netbook, the process took only about 300 milliseconds. For the occasional dynamic utility texture, that will do!
| A little annoying might just be the fact that you can’t compress the texture asynchronously — remember, asynchronous texture creation is only available on mobile, so these two features currently rule each other out. However, you never know what future updates of the AIR runtime will bring, so it’s not unlikely that this situation changes one day. |
16 bit Textures
Runtime ATF compression might not be available on mobile, but don’t forget that there’s an alternative format that will also save quite a bit of memory: RGBA_PACKED.
I mentioned it already in the Memory Management section.
That format reduces the color depth of your textures to 16 bit, which will obviously cause image quality to suffer. However, preprocessing the images with a dithering algorithm helps mitigate this issue. The advantage of this format: it is available on all platforms.
var bitmap:Bitmap = getDynamicBitmap();
var texture:Texture = Texture.fromBitmap(bitmap,
    false, false, 1, Context3DTextureFormat.BGRA_PACKED);
6.3.4. Custom Asset Types
Starling’s AssetManager includes support for all the asset types needed in a typical app, like textures, sounds, JSON data — you name it. However, it also allows adding your own asset types — after all, every project is different.
Let’s look at a real life example.
Per default, the AssetManager throws the BitmapData of all textures away after loading — to save memory. Sometimes, however, you need this data, e.g. to be able to look up individual pixels of a texture. So let’s create a custom AssetManager that
-
adds support for the asset type
bitmapDataand -
stores the bitmap data of any loaded PNG or JPG textures.
Adding a new Asset Type
The AssetManager groups assets by their type, with each type being identified via a unique string.
So, even though there is no bitmapData type prepared, you can easily store bitmap data inside the standard AssetManager.
For example, here’s how to store the bitmap data of a user’s avatar:
var assets:AssetManager = new AssetManager();
const bitmapDataType:String = "bitmapData";

// store avatar bitmap data
var inData:BitmapData = getAvatarBitmapData();
assets.addAsset("avatar", inData, bitmapDataType);

// retrieve avatar bitmap data
var outData:BitmapData = assets.getAsset(bitmapDataType, "avatar") as BitmapData;
The String bitmapData defines the new asset type, and you use it both for adding and retrieving any assets of that type.
You’ll probably want to store that String in a constant somewhere, to avoid typing errors.
What’s a little annoying is that you always have to cast the asset to the correct type (BitmapData) when retrieving it. Furthermore, it would be convenient if the asset type were recognized automatically when adding a bitmap data instance.
That’s why I recommend creating a new AssetManager subclass altogether when adding additional asset types. Like this:
public class MyAssetManager extends AssetManager
{
    public static const BITMAP_DATA_TYPE:String = "bitmapData";

    override public function addAsset(name:String, asset:Object, type:String = null):void
    {
        if (type == null && asset is BitmapData)
            type = BITMAP_DATA_TYPE;

        super.addAsset(name, asset, type);
    }

    public function getBitmapData(name:String):BitmapData
    {
        return getAsset(BITMAP_DATA_TYPE, name) as BitmapData;
    }
}
With this modification, adding and removing bitmap data is much more convenient.
var assets:MyAssetManager = new MyAssetManager();

// store avatar bitmap data
var inData:BitmapData = getAvatarBitmapData();
assets.addAsset("avatar", inData);

// retrieve avatar bitmap data
var outData:BitmapData = assets.getBitmapData("avatar");
This is really handy — but you typically don’t add assets manually to the AssetManager, do you? Instead, you enqueue files or URLs and let the AssetManager do the adding itself.
But how can we teach the AssetManager to store bitmap data during its loading process?
Asset Factories
The AssetManager actually doesn’t execute the complete loading process all by itself. It’s supported by a number of helper classes called "asset factories". One factory might by responsible for sounds, another for JSON data, and yet another for textures.
For example, the BitmapTextureFactory is used whenever a JPG or PNG file is encountered, or an embedded bitmap. Per default, it feeds the bitmap data into a new texture and then throws it away. That’s what we want to change.
We will create a custom factory that adds the bitmap data to the AssetManager instead. To do that, we could extend the AssetFactory class, like this:
public class KeepBitmapTextureFactory extends AssetFactory
{
    public function KeepBitmapTextureFactory()
    {
        addMimeTypes("image/png", "image/jpg", "image/jpeg");
        addExtensions("png", "jpg", "jpeg");
    }

    override public function canHandle(reference:AssetReference):Boolean
    {
        return reference.data is Bitmap || reference.data is BitmapData ||
            super.canHandle(reference);
    }

    override public function create(
        reference:AssetReference, helper:AssetFactoryHelper,
        onComplete:Function, onError:Function):void
    {
        var bitmapData:BitmapData = ... // TODO
        var texture:Texture = ... // TODO

        helper.addComplementaryAsset(reference.name, bitmapData);
        onComplete(reference.name, texture);
    }
}
When creating a custom asset factory, those are the steps you need to take:
-
Define which mime types and file extensions the factory is responsible for. That’s best done right in the constructor.
-
Override
canHandle, which needs to figure out if the class can handle a specific "raw" asset. The super call will simply check if the mime types and/or file extensions we just defined are a match. -
Override
create. That method will create the actual asset and pass it to theonCompletecallback. Any additional assets (here: the bitmap data) are passed to a method on thehelperobject.
Actually, we can simplify this a little bit, though.
After all, BitmapTextureFactory already does most of this work — no need to reinvent the wheel!
So, I recommend extending that class instead.
That way, we only need to override the create method.
public class KeepBitmapTextureFactory extends BitmapTextureFactory
{
    override public function create(
        reference:AssetReference, helper:AssetFactoryHelper,
        onComplete:Function, onError:Function):void
    {
        // TODO
    }
}
The reference object includes a data property that will store some kind of bitmap data when this method is called.
We need to convert that bitmap data into a texture and pass both bitmap data and texture to the AssetManager.
This is actually not that much work, but it takes a bit of set-up code to get it done.
Here’s the complete code:
override public function create(
    reference:AssetReference, helper:AssetFactoryHelper,
    onComplete:Function, onError:Function):void
{
    var texture:Texture;
    var data:Object = reference.data; (1)

    (2)
    if (data is Bitmap)
        onBitmapDataCreated((data as Bitmap).bitmapData);
    else if (data is BitmapData)
        onBitmapDataCreated(data as BitmapData);
    else if (data is ByteArray)
        createBitmapDataFromByteArray(data as ByteArray, onBitmapDataCreated, onError);

    function onBitmapDataCreated(bitmapData:BitmapData):void
    {
        // equivalent to `createFromBitmapData(bitmapData);`
        helper.executeWhenContextReady(createFromBitmapData, bitmapData); (3)
    }

    function createFromBitmapData(bitmapData:Object):void
    {
        reference.textureOptions.onReady = function():void (4)
        {
            helper.addComplementaryAsset(reference.name, bitmapData); (5)
            onComplete(reference.name, texture); (6)
        };

        texture = Texture.fromData(bitmapData, reference.textureOptions); (7)
    }
}| 1 | Here’s the raw asset we need to process. It could be either a Bitmap, a BitmapData, or a ByteArray with the raw file data. |
| 2 | BitmapData can be forwarded directly; for the ByteArray, we’re getting help from a method inherited from our base class. |
| 3 | In theory, we could forward the bitmap data right away. However, we can only create textures when there is a valid Stage3D context — this helper method makes sure of that. |
| 4 | The textureOptions property contains the requested texture settings, like scale factor, format, etc.
This includes a callback that’s executed once the texture is ready.
This is where we do the actual work! |
| 5 | Here, we’re adding the bitmap data asset to the AssetManager. |
| 6 | The texture itself is now ready (hence onReady); it is passed to onComplete. |
| 7 | This call initiates texture creation with the correct options. |
As you can see, the code relies heavily on callbacks and helper methods from the base class, so it looks a little more complicated than it really is.
What’s important is that both texture and bitmap data are added to the AssetManager, which is done via the onComplete callback and the addComplementaryAsset helper method.
We’ve got everything prepared now! All that’s left to do is telling our custom AssetManager to actually use this new factory. We’ll do that in its constructor.
public class MyAssetManager extends AssetManager
{
    public function MyAssetManager(scaleFactor:Number=1)
    {
        super(scaleFactor);
        registerFactory(new KeepBitmapTextureFactory(), 1);
    }
}
Remember, the AssetManager already contains a couple of different factories (set up in the "super" call).
It will try each factory in succession until it finds one that can actually handle the asset.
By registering our factory with a priority of 1 (last parameter), we make sure that it is tried before the default factories (which all have a priority of 0).
That’s it!
We just created our own custom AssetManager that will keep the bitmap data for all loaded textures and allows easy access via the custom getBitmapData method.
6.4. Visual Effects
6.4.1. Animating Text
Most games count the player’s score in some way. By awarding points, the player gets a sense of achievement and progress; add a leader board, and players can compete with each other.
To keep the player informed about the current score, there is probably a TextField somewhere on the stage. When the score changes, some code similar to the following will be executed:
_score += 100;
_scoreTextField.text = _score.toString();
That works, but it’s also a little dull. Since the score changes in an instant, it’s likely that the player does not even notice the change.
If the score would be raised in small steps, over the course of (say) a second, the change would be much more gratifying. The player could literally watch the additional points appear on the counter. But how best to achieve that?
The easiest way to animate things in Starling is, of course, to use a tween.
A tween, however, can only animate numerical properties; that rules out the text property (a String), right?
Well, not necessarily! All we have to do is create a numeric property that wraps the String access internally. For example, you could add the following property to the sprite containing the TextField:
public function get score():int { return _score; }
public function set score(value:int):void
{
    _score = value;
    _scoreTextField.text = value.toString();
}
Now we do have a numeric property, and it can be animated just like any other.
juggler.tween(this, 1.0, { score: this.score + 100 });This code raises the score in small steps over the course of a second, until it settles on the new value. That’s just what we wanted, and a quick test shows that it looks really neat (especially considering the little effort it took).
You need to be aware, though, that this code may cause a subtle problem when score changes occur in quick succession.
Let’s say the player scored 100 points, and you already started a tween that raises the player’s score from 0 to 100. Now, what happens if the player scores another 100 points before that animation is finished?
trace(this.score); // e.g. '87' (still being animated!)
juggler.tween(this, 1.0, { score: this.score + 100 });
Instead of a score of 200, we end up with a score of just 187! To avoid such side effects, it’s better to separate the score that’s currently displayed from the one that actually counts. My recommendation is to create a property like the following instead:
public function get displayedScore():int
{
    return int.parse(_scoreTextField.text);
}

public function set displayedScore(value:int):void
{
    _scoreTextField.text = value.toString();
}
That way, you can access the actual score (this.score) separately from the one that’s currently displayed (this.displayedScore).
With that strategy, you won’t run into any problems.
this.score += 100;
juggler.tween(this, 1.0, { displayedScore: this.score });

trace(this.score);          // -> 200
trace(this.displayedScore); // -> 100
6.4.2. Water Reflection
In the early years of the Internet, many web developers — frustrated by the limitations of early HTML — used Flash simply to show off. Even if the website itself didn’t have much content, you could be sure there was a Flash intro and some kind of animated reflection effect. Anybody with a tiny bit of self respect simply had to do it!
Thankfully, those days are long over. Nevertheless, a part of me still likes eye-candy like that. If used with care, an unobtrusive reflection might be turned into a nice special effect. So let’s look at how this can be achieved with Starling.
The Plain Reflection
For this sample, we will set up a sprite with a bird flying in front of a colorful sky.
The basic (flat) reflection is actually achieved with a really lame trick: we simply create the same sprite twice and flip the bottom one vertically. Here is the basic setup-code, to be called e.g. from the constructor of a sprite.
private function setup():void
{
    var topSprite:Sprite = createSprite(); (1)
    addChild(topSprite);

    var bottomSprite:Sprite = createSprite(0xddeeff); (2)
    bottomSprite.scaleY = -1; (3)
    bottomSprite.y = topSprite.height * 2;
    addChild(bottomSprite);
}

private function createSprite(tint:uint=0xffffff):Sprite
{
    var sprite:Sprite = new Sprite();
    var sky:Image = new Image(assets.getTexture("dusk-sky"));
    sky.color = tint;
    sprite.addChild(sky);

    var bird:MovieClip = new MovieClip(assets.getTextures("bird-")); (4)
    bird.alignPivot();
    bird.x = sky.width / 2;
    bird.y = sky.height / 2;
    sprite.addChild(bird);
    juggler.add(bird); (5)

    return sprite;
}| 1 | The top sprite contains the upright objects; that’s what we are directly looking at. |
| 2 | The bottom sprite represents the reflection. By tinting the sky image in light blue, we can make it look more like water. |
| 3 | This code flips the bottom sprite vertically. |
| 4 | The bird animation is implemented with a MovieClip. |
| 5 | This code supposes that the class contains a custom Juggler.
You could also use the standard Starling.juggler, of course. |
Now what we are seeing is this:

Adding a Distortion
For the distortion effect, we are going to use Starling’s DisplacementMapFilter. That’s an extremely versatile filter that can distort the pixels of an object via a map texture. It’s not the easiest filter to use and set up, but once you master it, you can achieve amazing things.
Step one is to create a map texture.
To create such a texture, we can use the perlinNoise method of Flash’s BitmapData class.
| The Perlin Noise algorithm produces a pseudo-random noise texture that’s perfect to simulate natural phenomena like clouds or water. |
The following settings work fine:
var perlinData:BitmapData = new BitmapData(width, height, false);
perlinData.perlinNoise(200, 12, 2, 0, true, true, 0, true);
The fifth parameter of the perlinNoise method is called stitch.
Note that we set it to true — this will become important in a minute.

| The sophisticated process I used to arrive at suitable values is called "trial & error". |
Now we can create a DisplacementMapFilter with our Perlin noise as mapTexture:
var mapTexture:Texture = Texture.fromBitmapData(perlinData);
var filter:DisplacementMapFilter = new DisplacementMapFilter(
    mapTexture, BitmapDataChannel.RED, BitmapDataChannel.RED, 15, 15);

bottomSprite.filter = filter;
Here’s what all those parameters are:
| mapTexture |
The texture with our Perlin noise. |
| componentX |
Displacement in x-direction is read from the |
| componentY |
Displacement in y-direction is read from the |
| scaleX |
Pixels are distorted up to 15 points horizontally. |
| scaleY |
Pixels are distorted up to 15 points vertically. |
The components decide which channel of the map texture is used for the distortion. In our case, the filter looks at the values of the red channel. Since our texture is black and white, though, it doesn’t really matter which one we use.
With that filter applied, the bottom sprite looks like this:

Animating the Reflection
Right now, this effect is purely static. In order to simulate a live, moving surface, we need to animate this reflection. How could we do that?
The first thing that comes to mind: we could update the Perlin texture each frame, always slightly changing its parameters. That would work — but it’s very expensive; after all, we would need to create and upload a new texture in each and every frame. We clearly need a more efficient approach.
If you review the DisplacementMapFilter API, you’ll find that it contains the properties mapX and mapY.
Those parameters configure an offset for the map texture lookup.
In other words, you can move the map texture to a different position relative to the filtered object.
That’s exactly what we need: by tweening mapY to a different value, we can slowly move the map texture downwards.
In motion, the output will look just like the rising and falling waves of water.
The problem, though, is that this animation can’t go on forever. We can only move the map texture while it’s still overlapping the target image. If we move it any further, the map texture will end, and there’s no more distortion.
That, however, can be solved with a neat little trick.
In Stage3D (and Starling), a texture can be set up to repeat endlessly — just like a wallpaper. When our map texture is configured like that, we will never run out of Perlin noise.
Texture repeat does not work with all kinds of textures, though. You can only use this feature with textures that have side lengths that are powers of two (e.g. 256×128, 512×1024, etc). That’s not really a problem in our case, since the Perlin texture is created dynamically, anyway.
Let’s move the generation of the map texture into a new method:
private function createMapTexture(minWidth:Number, minHeight:Number):Texture
{
    var width:Number  = MathUtil.getNextPowerOfTwo(minWidth); (1)
    var height:Number = MathUtil.getNextPowerOfTwo(minHeight);
    var perlinData:BitmapData = new BitmapData(width, height, false);
    perlinData.perlinNoise(200, 12, 2, 0, true, true, 0, true); (2)
    return Texture.fromBitmapData(perlinData, false, false, 1, "bgra", true); (3)
}| 1 | For both width and height, we pick the next suitable powers of two. For example, if the object is 400 pixels wide, the texture will have a width of 512 pixels. |
| 2 | The Perlin noise is created just like before, with stitch enabled. |
| 3 | This method call leaves all parameters at their default values — except for last one: forcePotTexture.
This makes sure the texture is created with the specific "power-of-two" texture type. |
Since we enabled the stitch parameter when creating the Perlin texture, and since we created it as "power-of-two" texture, it can be seamlessly repeated.

With that method prepared, we can now instantiate the DisplacementMapFilter.
var map:Texture = createMapTexture(bottomSprite.width, bottomSprite.height);
var filter:DisplacementMapFilter = new DisplacementMapFilter(
        map, BitmapDataChannel.RED, BitmapDataChannel.RED, 15, 15);
filter.mapRepeat = true; (1)
juggler.tween(filter, 5, { mapY: map.height, repeatCount: 0 }); (2)
bottomSprite.filter = filter;| 1 | This is crucial: we need to tell the filter that the map texture should actually repeat. |
| 2 | The animation itself is a simple tween of mapY.
To make the tween repeat endlessly, we assign a repeatCount of zero. |
To make this a little clearer, think of the map texture as an endless ribbon that lines up one Perlin texture after the other.
When you move that ribbon downwards, there is always another texture to replace the previous one.
Our tween will reset after scrolling through just one texture, but we could also just raise mapY indefinitely; we will never run out of textures.

If you try that out now, you’ll see that the animation does in fact loop seamlessly. However, one small flaw is remaining: the edges of the object are distorted, too.
To get rid of that, we need to deactivate all padding on the filter.
Per default, the DisplacementMapFilter sets up padding high enough so that nothing gets clipped away.
In our case, this clipping is actually what we want, so we undo that automatism.
filter.padding.setTo(); (1)| 1 | Sets the padding to zero in all directions. |

I think the outcome is pretty neat, especially considering that this effect is actually rather lightweight!
After all, it’s just the one mapY property that’s animated in each frame.
6.4.3. Pixelation
Are there any Super Mario fans around? I’ve been fascinated with this game series since I was a child. I must have spent hundreds of hours in the Mushroom Kingdom; I don’t think I skipped any of the major games.
The first time I played "Super Mario World" on the Super NES, with its huge, colorful sprites and bold sound effects — that was probably one of the defining moments leading to my current career. In general, the Super NES featured special effects that were ahead of its time. For example, there was a particular type of transition: the complete screen became gradually pixelated and normal again, concealing an underlying change of the scenery.
When I recently saw that again, I wondered: can this effect be reproduced in Starling? That’s what we are going to try in this section.
Here’s the battle plan:
-
Render a display object into a texture.
-
Gradually lower the resolution until the pixels are really big.
-
At that moment, change the contents of the display object.
-
Gradually enhance the resolution until it’s back to normal.
Whenever you read "render a display object into a texture", a bell should start ringing in your head, reminding you of the FragmentFilter class. That kind of task is exactly what filters are doing very efficiently. Actually, we already used them for rendering in a very high resolution (see Anti-Aliasing Strategies); now we are going to do the opposite: rendering in a very low resolution.
The resolution into which a FragmentFilter renders the filtered object is determined by a property with the same name.
A value of 1 will use the full pixel density of the screen; a value of 0.5 just half of that, etc.
That property is the key to making this effect possible.
As a first test, assign a FragmentFilter to a display object and animate its resolution property.
Like this:
object.filter = new FragmentFilter(); (1)
object.filter.textureSmoothing = TextureSmoothing.NONE; (2)
juggler.tween(object.filter, 0.5, {
    resolution: 0.05, (3)
    repeatCount: 2, (4)
    reverse: true (5)
});| 1 | Create a new FragmentFilter instance and assign it to the display object. |
| 2 | To get the pixelated style, we need to turn off any texture smoothing. |
| 3 | A resolution of 0.05 will yield a maximum pixel size of 20 (1 / 0.05). |
| 4 | Create an "up-and-down" animation by repeating the tween two times and … |
| 5 | … reversing the second repetition. |
That works, but somehow it doesn’t look all that great in practice. Somehow, the animation spends too much time with small pixels and shows big pixels only very briefly.
We can mitigate that by changing the transition type. Add the following key-value pair to the tween setup:
transition: Transitions.EASE_OUTThat’s much better!
Granted: this is not a real transition yet — we just temporarily altered the appearance of an object. What we actually need to do is change the object halfway through the animation (when the pixels are biggest). Furthermore, when the transition is finished, we need to remove and dispose the filter.
That’s easily done via the callbacks offered by the Tween class.
// add another set of tween properties
onRepeat:   changeContents,      (1)
onComplete: onTransitionComplete (2)

private function changeContents():void
{
    // do whatever needs to be done
    object.changeContents();
}

private function onTransitionComplete():void
{
    object.filter.dispose();
    object.filter = null;
}| 1 | Called just before the tween repeats (in reverse). |
| 2 | Called at the very end of the animation. |
That does the trick!
Changing the Animation Steps
That’s already looking quite nice, but I’m not 100% content yet. Somehow, the animation feels a little bumpy, don’t you think?
What I’d actually like to see is that pixel sizes change in a more orderly manner. For example, we could try doubling the pixel size in each animation step (1, 2, 4, 8, etc).
One way of doing that is by extending the FragmentFilter class and adding a property that describes the resolution in these terms.
class PixelationFilter extends FragmentFilter
{
    public function set level(value:int):void
    {
        resolution = 1 / (Math.pow(2, value)); (1)
    }

    public function get level():int
    {
        return Math.log(1 / resolution) / Math.log(2); (2)
    }
}| 1 | The level property sets the pixels size to 2 to the power of level. |
| 2 | The binary logarithm converts resolution back to level. |
That code actually does not add any real new functionality; it just provides a different way of changing the resolution: an integer that doubles the pixel size in each step. Animating this new property will yield the result we are looking for.
object.filter = new PixelationFilter();

juggler.tween(object.filter, 0.5, {
    level: 6.5,
    repeatCount: 2,
    reverse: true,
    onRepeat: changeContents,
    onComplete: onTransitionComplete
});
Personally, I like the result of that updated transition better than the old one. However, that’s probably a matter of taste.
Either way, what you can take away from this section is the following: the style of an animation can sometimes be modified by creating a different representation of the property being animated.
|
Note that I set the level to Yes, you can officially call me a nitpicker! |
6.4.4. Outline
We already learned about two techniques to add outlines to fonts:
-
When creating the bitmap font texture, bake the outline right in.
-
Use a distance field font.
Unfortunately, both of those techniques are not an option for TextFields using TrueType fonts. However, there is a way to add an outline at runtime to any kind of object: by "abusing" the GlowFilter slightly.
The trick is to use an alpha-value that’s higher than 1.0; much higher, in fact.
The GlowFilter is implemented in a way that when alpha exceeds 1.0, it acts as a strength-multiplier, making the edges of the glow harder.
For example, to add a black outline to an object, set up the filter like this:
object.filter = new GlowFilter(0x0, 50, 1.0, 1.0);For reference, these are the arguments used in that sample:
| color |
In this case, pure black ( |
| alpha |
The higher the value, the more crisp the edge will be; too high values will produce jagged edges, though. |
| blur |
A value of |
| resolution |
For outlines, I recommend to use the full resolution ( |
The result looks like this:

Of course, that works not just for TextFields, but for any kind of display object.
Remember to cache() the filter to spare valuable draw calls!
|
6.4.5. Flippable Images
Before I started working full-time for my own company, I spent several years developing casual games for coin-operated gaming terminals. Believe me, I created my share of card games!
A typical requirement in a card game: flipping cards around. Starling’s Sprite3D class is the perfect tool for this job, as it makes the cards literally pop out of the screen. It was created exactly with such simple effects in mind.
To flip a Sprite3D around, you simply animate rotationX or rotationY, like this:
juggler.tween(card, 1.0, { rotationY: Math.PI });There is only one problem: the back of the card looks just like the front, except that it’s mirrored. How can we change the way the card looks from behind?
I will show you two ways to achieve this result; both are educational in their own way.

The first step, for both approaches, is to create a custom class that inherits from Sprite3D. Only a Sprite3D can be rotated in a 3D space, so this shouldn’t come as a surprise. It will contain both front and back side.
class Card3D extends Sprite
{
    private var _front:DisplayObject;
    private var _back:DisplayObject;

    public function Card3D(front:DisplayObject, back:DisplayObject)
    {
        _front = front;
        _back = back;

        _front.alignPivot(); (1)
        _back.alignPivot();

        _back.scaleX = -1; (2)

        addChild(_front); (3)
        addChild(_back);
    }
}| 1 | The cards should be rotated around the center, so we align the pivot points accordingly. |
| 2 | We don’t want the back of the card to appear mirrored, so we flip it. The two flip operations will cancel each other out. |
| 3 | Both objects are added as children. |
That code is mostly straight-forward; the only thing that might come as a surprise is that the back side is flipped. When you think it through, though, it makes perfect sense: the back side must be facing in the opposite direction as the front.
Now we need to decide which of the two sides is visible at any given moment.
Approach 1: Visibility via Camera Position
In the first approach, we are using the relative camera position to find out if the card is viewed from above or below. Make the following changes to the Card3D class:
public function Card3D(front:DisplayObject, back:DisplayObject)
{
    /* ... */

    addEventListener(Event.ENTER_FRAME, updateVisibility); (1)
}

private function updateVisibility():void
{
    var cameraPos:Vector3D = Pool.getPoint3D(); (2)
    stage.getCameraPosition(this, cameraPos);   (3)

    _front.visible = cameraPos.z <  0; (4)
    _back.visible  = cameraPos.z >= 0;

    Pool.putPoint3D(cameraPos); (5)
}| 1 | The visibility is updated each frame in which the object is part of the display list. |
| 2 | To avoid any temporary allocations, the Vector3D instance storing the camera position is taken from Starling’s object pool. |
| 3 | This method calculates the current camera position within the local (!) coordinate system. |
| 4 | The z-coordinate tells us if we are looking at the card from above or below. |
| 5 | The temporary vector must be put back into the pool. |
The updateVisibility method is where the actual magic is happening.
It uses the stage method getCameraPosition to find out where the camera is located within the local coordinate system.
In Starling, the z-axis points away from the camera (into the screen), so a negative z-coordinate means we are looking at the front of the card.
It’s as simple as that!
The downside of this approach is that the calculation is executed each and every frame, even if the card is not actually moving. Since the calculation is not that expensive, we will probably get away with that, though.
Still, let’s find out if the alternative approach is more efficient!
|
Adding and Removing an Event Listener
In the code above, we added a listener for the No, in this case, this is not necessary.
That’s because the event listener is added to Had the event been added to a different object instead (e.g. the stage), it would have been crucial to remove it later. Otherwise, the reference to the event handler would stay in memory until that object is disposed. In the case of the stage, this won’t happen until the app itself is shut down. |
Approach 2: Visibility via Back-face Culling
The render pipelines of APIs like Stage3D and OpenGL were designed mainly with 3D graphics in mind. Many of the optimizations available for 3D graphics don’t make much sense in Starling’s typical 2D scenes, so they lie idle. In this case, though, we are actually working with a 3D object — so we can put one of those optimizations to good use!
I’m talking about Back-face Culling.
Typically, a polygon is always seen from the same side. Picture a cube before your inner eye: at any given moment, you will only see three (or less) of its side walls. Visible are only those you are facing from the outside.
Graphics pipelines make use of this: a polygon that’s seen from the wrong side doesn’t need to be rendered at all. In Starling, this optimization is deactivated; in general, when you flip an image horizontally, you still want to see it. Not so in this case, though!
If we enable back-face culling for our Card3D class, the GPU will take care of making only the correct side visible. We already flipped the back side of the card (in the constructor), so it’s facing in the opposite direction as the front. All that’s left to do is configuring Stage3D for culling.
To do that, override the render method:
override public function render(painter:Painter):void
{
    painter.pushState(); (1)
    painter.state.culling = Context3DTriangleFace.BACK; (2)

    super.render(painter); (3)

    painter.popState(); (4)
}| 1 | This call stores the current render state (read: Stage3D settings) so it can be restored later. |
| 2 | We change the culling setting of the render state so that objects viewed from the back side become invisible. |
| 3 | The actual rendering is best handled by the super class. |
| 4 | We restore the original render state. Most likely, this will also force an immediate draw call. |
Since culling is done by the GPU, this is extremely efficient.
|
Still, I need to mention one downside of this solution.
Normally, Sprite3D objects that do not contain any 3D transformations (i.e. To fix this, we need to implement culling not on a per-card basis, but further up the display list, e.g. on the container that manages the cards.
Overwrite the |
6.5. Miscellaneous
For this section, I compiled a list of other small tips and tricks that don’t quite warrant putting them into their own chapters. Read on to find some real gems!
6.5.1. Event Data
As we explored Starling’s event system, I mentioned that the Event class contains a data property that may take up any kind of object or primitive data type.
The contents of that property is then passed to an optional second parameter of the event handler.
It’s not very well documented, but most of Starling’s standard events make use of this property. This means that you often have direct access to the data you need, allowing you to simplify your event handlers slightly.
For example, in an EnterFrameEvent, you typically want to know the time that has passed since the previous frame. To do this, you can either use the property on the respective event:
function(event:EnterFrameEvent):void
{
    var passedTime:Number = event.passedTime;
    juggler.advanceTime(passedTime);
}
Or you can let Starling populate the second parameter with the passed time.
function(event:Event, passedTime:Number):void
{
    juggler.advanceTime(passedTime);
}
Note that I didn’t even declare the first parameter as EnterFrameEvent; I don’t need any specific data from that object, so why bother?
Here are all the data-shortcuts provided by Starling’s standard events:
// EnterFrameEvent
function(e:Event, passedTime:Number):void;

// KeyboardEvent
function(e:Event, keyCode:uint):void;

// ResizeEvent
function(e:Event, size:Point):void;

// TouchEvent
function(e:Event, touches:Vector.<Touch>):void;

// Event.ROOT_CREATED
function(e:Event, root:YourRootClass):void;
6.5.2. Keyboard Input
In previous Starling versions, the KeyboardEvent was dispatched to all display objects. While this was very convenient, it also caused some performance issues — thus, this behavior was changed in Starling 2. Keyboard events are now only dispatched to the stage.
When you listen to an event on the stage, you need to be a little careful: you have to make sure that you remove the handler when you do not need it any longer. After all, the stage exists for the complete lifetime of the application; any event handlers on it will be kept in memory for all that time.
My recommendation: make a detour over the ADDED_TO_STAGE and REMOVED_FROM_STAGE event handlers when listening for keyboard input.
A small helper method can automate the process.
public static function addStageEventListener(
    target:DisplayObject, type:String, listener:Function):void
{
    target.addEventListener(Event.ADDED_TO_STAGE, onAddedToStage);
    target.addEventListener(Event.REMOVED_FROM_STAGE, onRemovedFromStage);

    if (target.stage) onAddedToStage();

    function onAddedToStage():void
    {
        target.stage.addEventListener(type, listener);
    }

    function onRemovedFromStage():void
    {
        target.stage.removeEventListener(type, listener);
    }
}| Personally, I always add a Helpers-class to my application that takes up utility methods like that one. |
Using this method, you can add a perfectly safe KeyboardEvent handler to an object like this:
public class MySprite extends Sprite
{
    public function MySprite()
    {
        Helpers.addStageEventListener(
            this, KeyboardEvent.KEY_UP, onKeyUp);
    }

    private function onKeyUp(e:Event, keyCode:uint):void
    {
        if (keyCode == Keyboard.ESCAPE)
            /* ... */
    }
}
That way, it’s guaranteed that the event listener doesn’t stay around longer than needed. It is only active as long as it’s part of the display list.
Of course, a similar approach can be taken for all kinds of events dispatched by the stage or any other independent object.
6.5.3. Custom Transitions
The Transitions class contains some standard easing functions to be used by Tweens, e.g. the standard EASE_IN / EASE_OUT or its elastic our bouncing alternatives.
But did you know that you can set up your own transition methods, too?
That way, you can add more fine-grained easing equations (like quadratic or sine transitions, for example). You can even bend the whole system to your needs — who says that a tween must really end at the provided endpoint?
For example, it’s sometimes useful to highlight a button or icon by letting it jump up ("Pick me! Pick me!").
That can be implemented via a custom jump transition.
Transitions.register("jump",
    function(ratio:Number):Number
    {
        return Math.sin(ratio * Math.PI);
    });
A transition method contains just one parameter: ratio.
It indicates the current position within the tween and ranges from zero (animation start) to one (animation end).
The return value will tell the tween if the animated property should remain at the start value (0), the end value (1), or something in between.
For example, a value of 0.5 would indicate the exact midpoint between start and end value.
For our jump animation, we simply forward ratio * π to the sine function; that will yield a simple up-and-down movement.
That transition function only needs to be registered once, e.g. during application startup.
With that in place, the following code lets an object jump up 100 points before falling down to its original position:
juggler.tween(object, 0.5, {
    y: object.y - 100,
    transition: "jump"
});
Handy, right?
While you’re at it, also check out the new BezierEasing class that was introduced in Starling 2.5.
Just like its CSS sibling cubic-bezier (which web developers might recognize), it makes it really easy to create custom transitions.
Use a visual tool like cubic-bezier.com or Ceaser to draw your curve; then pass the four coordinates to the new BezierEasing.create() method.

Do you want to mimic the exact easing functions used by CSS animations? BezierEasing makes it possible.
Transitions.register("ease",        BezierEasing.create(0.25, 0.1, 0.25, 1));
Transitions.register("ease-in",     BezierEasing.create(0.42, 0, 1, 1));
Transitions.register("ease-out",    BezierEasing.create(0, 0, 0.58, 1));
Transitions.register("ease-in-out", BezierEasing.create(0.42, 0, 0.58, 1));
Also, if you’re creating an app that follows Google’s Material Design System, you can make sure that your tweens behave exactly as recommended. You just need to set up the appropriate transitions like this:
Transitions.register("standard",   BezierEasing.create(0.4, 0.0, 0.2, 1.0));
Transitions.register("decelerate", BezierEasing.create(0.0, 0.0, 0.2, 1.0));
Transitions.register("accelerate", BezierEasing.create(0.4, 0.0, 1.0, 1.0));
6.5.4. Image vs. Quad
Since Starling 2, the difference between Quad and Image is more subtle than in the past. Previously, if you needed just a color or gradient, you used Quad; if you needed a texture, you used Image. Now, however, a Quad can be textured just the same. Thus, you actually don’t need the Image class very often.
The following two lines of code are almost equivalent:
var quad:Quad = Quad.fromTexture(texture);
var image:Image = new Image(texture);
Why is there even an Image class then? To be honest: mostly for backwards compatibility. I didn’t want to burden all Starling developers with having to exchange all of their Image instances when upgrading to version 2!
The new Image class can do more, though, as it contains two useful new properties.
tileGrid-
Repeats the same texture over and over, filling up the area with a certain tile. We made use of this in the Scrolling chapter of the Flappy Bird game.
scale9Grid-
Divides an image into nine regions that scale differently. Useful for scalable interface elements like buttons or borders.
You are probably wondering: when you don’t need those features, should you use Quad or Image? If you are looking for maximum efficiency, the answer is Quad, since it’s a little more lightweight.
On the other hand, the difference is so small that it will be hard to measure. Personally, I’m still sticking to Image most of the time — it’s hard to get rid of old habits, right?
BitmapFont Native Size
What’s annoying about bitmap fonts is that they only look really crisp if used in the exact same size they were created with. Scaling them up or down often leads to blurry results.
To display them in the optimal size, use the NATIVE_SIZE constant:
var text:TextField = new TextField(300, 80, "Cowabunga!");
text.format.setTo("Tahoma", BitmapFont.NATIVE_SIZE);
So far, so good — we already covered that. There is a little more to that constant, though.
When scaling down, you often get away with acceptable results if you scale by ratios like 1/2, 1/3, 1/4, etc.
The NATIVE_SIZE property can be used for that, too — just multiply the constant by the appropriate ratio.
text.format.setTo("Tahoma", BitmapFont.NATIVE_SIZE * 0.5);Furthermore, when you are shooting for a retro look with a pixelated font, you might want to scale up using a whole number. As to be expected, that works similarly:
text.format.setTo(BitmapFont.MINI, BitmapFont.NATIVE_SIZE * 2);
Speaking about pixelated fonts: don’t forget to set the smoothing property of your BitmapFont to TextureSmoothing.NONE for such fonts.
Or, even better, set the smooth attribute in the font XML to 0.
|
6.6. Summary
This chapter described lots of different ways to make use of the Starling and ActionScript APIs in creative or surprising ways. You learned
-
about the memory pitfalls coming with the ByteArray API, as well as how to use it as a StringBuilder.
-
how best to embed an SWF file in a website.
-
how to recognize the most important multi-touch gestures.
-
that the FragmentFilter class can be used to replace
cacheAsBitmapandBlendMode.LAYER, and to apply selective anti-aliasing. -
that the MeshBatch provides the fastest way to render a massive number of tiles and …
-
… how to avoid the problems that arise in the process.
-
that you can load textures asynchronously to keep your app responsive.
-
how to squeeze more textures into memory by compressing them at runtime.
-
several neat visual effects that utilize some of Starling’s standard features.
I must say I really enjoyed writing this chapter, as it puts all different parts of Starling to good use. I hope some of my excitement carried over to you!